Android WearのViewPagerでページにインジケータを表示させます。
【準備】
1.「Extrasライブラリ(Android Support Library v20等)のアップデート」の手順で、「Android Support Library」をv20に更新しておきます。
2.「wearable 1.0.0のライブラリプロジェクトの作成方法」の手順で、「wearable 1.0.0」のライブラリプロジェクトを作成しておきます。
※ADT23.0.2ではAndroid Wearに対応していない為の、暫定処置です。
※実機でデバッグする場合には以下を実行しておきます。
「Sumsung Gear LiveのADBドライバのインストール方法」の手順で、ADBドライバをインストールしておきます。
【手順1】
1.「Androidプロジェクトの作成・実行方法(バージョン別一覧)」のAndroidプロジェクトの作成手順で、「AndroidWearSample15-003-ViewPagerIndicator」といプロジェクトを作成。
※プロジェクトの設定は以下の通り。
※他の項目は任意。
| 項目名 | 項目に設定する値 |
| アプリケーション名(Application Name) | com.example.androidwearsample15_003 |
| プロジェクト名(Project Name) | AndroidWearSample15-003-ViewPagerIndicator |
| パッケージ名(Package Name) | com.example.androidwearsample15_003 |
| Build SDK | API 20 |
| Minimum Required SDK | API 20 |
2.「wearable 1.0.0プロジェクトをライブラリに指定する方法」の手順で、wearable 1.0.0をライブラリ設定しておきます。
3.「android-support-v13.jarをライブラリに設定する方法」の手順で、android-support-v13.jarをライブラリ設定しておきます。
【手順2】
1.「AndroidManifest.xml」は以下の通り。
<manifest xmlns:android="http://schemas.android.com/apk/res/android"
    package="com.example.androidwearsample15_003"
    android:versionCode="1"
    android:versionName="1.0" >

    <uses-sdk
        android:minSdkVersion="20"
        android:targetSdkVersion="20" />

    <application
        android:allowBackup="true"
        android:icon="@drawable/ic_launcher"
        android:theme="@android:style/Theme.DeviceDefault.Light" >
        <activity android:name="com.example.androidwearsample15_003.MainActivity" >
            <intent-filter>
                <action android:name="android.intent.action.MAIN" />

                <category android:name="android.intent.category.LAUNCHER" />
            </intent-filter>
        </activity>
    </application>

</manifest>
2.「Ctrl+Shift+F」を押し、コードをフォーマッティング。3.「Ctrl+S」を押し、ファイルを保存。
【手順3】
1.「res/layout/activity_main.xml」は以下の通り。
<RelativeLayout xmlns:android="http://schemas.android.com/apk/res/android"
    android:layout_width="match_parent"
    android:layout_height="match_parent"
    android:background="@color/white" >

    <android.support.v4.view.ViewPager
        android:id="@+id/pager"
        android:layout_width="match_parent"
        android:layout_height="match_parent"
        android:background="#000" />

    <LinearLayout
        android:layout_width="wrap_content"
        android:layout_height="wrap_content"
        android:layout_alignParentBottom="true"
        android:layout_centerHorizontal="true"
        android:layout_marginBottom="10dp" >

        <ImageView
            android:id="@+id/indicator1"
            android:layout_width="wrap_content"
            android:layout_height="wrap_content"
            android:layout_marginRight="5dp"
            android:src="@drawable/full" />

        <ImageView
            android:id="@+id/indicator2"
            android:layout_width="wrap_content"
            android:layout_height="wrap_content"
            android:layout_marginRight="5dp"
            android:src="@drawable/empty" />

        <ImageView
            android:id="@+id/indicator3"
            android:layout_width="wrap_content"
            android:layout_height="wrap_content"
            android:src="@drawable/empty" />
    </LinearLayout>

</RelativeLayout>
2.「Ctrl+Shift+F」を押し、コードをフォーマッティング。3.「Ctrl+S」を押し、ファイルを保存。
【手順4】
1.「任意のファイルの作成方法」の手順で「res/layout/fragment_sample.xml」を作成。
2.「res/layout/fragment_sample.xml」は以下の通り。
<LinearLayout xmlns:android="http://schemas.android.com/apk/res/android"
    android:layout_width="match_parent"
    android:layout_height="match_parent"
    android:background="@color/white"
    android:orientation="vertical" >

    <TextView
        android:id="@+id/text"
        android:layout_width="fill_parent"
        android:layout_height="wrap_content" />

    <Button
        android:layout_width="wrap_content"
        android:layout_height="wrap_content"
        android:text="ボタン" />

</LinearLayout>
3.「Ctrl+Shift+F」を押し、コードをフォーマッティング。4.「Ctrl+S」を押し、ファイルを保存。
【手順5】
1.「任意のディレクトリの作成方法」の手順で「res/drawable」ディレクトリを作成。
2.以下の画像を「empty.png」という名前で保存。
3.以下の画像を「full.png」という名前で保存。

【手順6】
1.「src/com/example/androidwearsample15_003/MainActivity.java」は以下の通り。
package com.example.androidwearsample15_003;

import java.util.ArrayList;
import java.util.List;

import android.app.Activity;
import android.app.Fragment;
import android.app.FragmentManager;
import android.os.Bundle;
import android.support.v13.app.FragmentPagerAdapter;
import android.support.v4.view.ViewPager;
import android.widget.ImageView;

public class MainActivity extends Activity {
    private ViewPager viewPager;
    private ImageView indicator1;
    private ImageView indicator2;
    private ImageView indicator3;

    @Override
    protected void onCreate(Bundle savedInstanceState) {
        super.onCreate(savedInstanceState);
        setContentView(R.layout.activity_main);
        viewPager = (ViewPager) findViewById(R.id.pager);
        indicator1 = (ImageView) findViewById(R.id.indicator1);
        indicator2 = (ImageView) findViewById(R.id.indicator2);
        indicator3 = (ImageView) findViewById(R.id.indicator3);
        PagerAdapter adapter = new PagerAdapter(getFragmentManager());
        adapter.addFragment(new SampleFragment(1));
        adapter.addFragment(new SampleFragment(2));
        adapter.addFragment(new SampleFragment(3));
        setIndicator(1);
        viewPager.setOnPageChangeListener(new ViewPager.OnPageChangeListener() {
            @Override
            public void onPageSelected(int i) {
                setIndicator(i + 1);
            }

            @Override
            public void onPageScrolled(int i, float f, int j) {
            }

            @Override
            public void onPageScrollStateChanged(int i) {
            }
        });

        viewPager.setAdapter(adapter);

    }

    private void setIndicator(int i) {
        switch (i) {
            case 1:
                indicator1.setImageResource(R.drawable.full);
                indicator2.setImageResource(R.drawable.empty);
                indicator3.setImageResource(R.drawable.empty);
                break;
            case 2:
                indicator1.setImageResource(R.drawable.empty);
                indicator2.setImageResource(R.drawable.full);
                indicator3.setImageResource(R.drawable.empty);
                break;
            case 3:
                indicator1.setImageResource(R.drawable.empty);
                indicator2.setImageResource(R.drawable.empty);
                indicator3.setImageResource(R.drawable.full);
                break;
            default:
                break;
        }
    }

    private class PagerAdapter extends FragmentPagerAdapter {
        List<Fragment> fragmentList = null;

        public PagerAdapter(FragmentManager fragmentManager) {
            super(fragmentManager);
            fragmentList = new ArrayList<Fragment>();
        }

        @Override
        public Fragment getItem(int position) {
            return fragmentList.get(position);
        }

        @Override
        public int getCount() {
            return fragmentList.size();
        }

        public void addFragment(Fragment fragment) {
            fragmentList.add(fragment);
            notifyDataSetChanged();
        }
    }
}
2.「Ctrl+Shift+F」を押し、コードをフォーマッティング。3.「Ctrl+S」を押し、ファイルを保存。
【手順7】
1.「任意のファイルの作成方法」の手順で「src/com/example/androidwearsample15_003/SampleFragment.java」を作成。
2.「src/com/example/androidwearsample15_003/SampleFragment.java」は以下の通り。
package com.example.androidwearsample15_003;

import android.app.Fragment;
import android.os.Bundle;
import android.view.LayoutInflater;
import android.view.View;
import android.view.ViewGroup;
import android.widget.TextView;

public class SampleFragment extends Fragment {
    private int pageNo;

    public SampleFragment(int pageNo) {
        this.pageNo = pageNo;
    }

    @Override
    public View onCreateView(LayoutInflater inflater, ViewGroup container, Bundle savedInstanceState) {
        View view = inflater.inflate(R.layout.fragment_sample, container, false);
        ((TextView) view.findViewById(R.id.text)).setText(pageNo + "ページ目");
        return view;
    }
}
3.「Ctrl+Shift+F」を押し、コードをフォーマッティング。4.「Ctrl+S」を押し、ファイルを保存。
【手順8】
1.「Androidプロジェクトの作成・実行方法(バージョン別一覧)」のAndroidプロジェクトの実行手順で、実行。
※Android Wearの実機で動かす場合は、実機とPCをUSBで接続する。
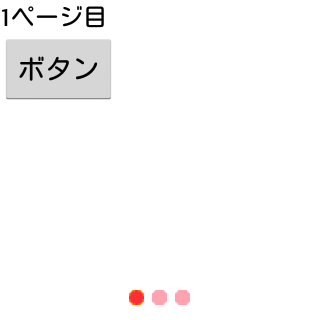
【手順9】
1.Sumsung Gear Live(Android Wear)の場合、以下の様に表示されます。
2.2ページ目です。

以上です。
0 件のコメント:
コメントを投稿
注: コメントを投稿できるのは、このブログのメンバーだけです。