最近の更新

ラベル AngularJS の投稿を表示しています。 すべての投稿を表示

2016年10月19日水曜日

チェックボックスのチェンジイベント

【目的】
AngularJSで、チェックボックスのチェンジイベントを使います。


【手順】
1.『AngularJS1.5.8のダウンロード方法』の手順で、AngularJS1.5.8をダウンロードしておきます。
2.『index.html』というファイルを作成。
3.『index.html』を以下の様に入力。
<!doctype html>
<html ng-app="mainModule">
    <head>
        <script src="angular.min.js"></script>
        <script>
            var mainModule = angular.module('mainModule',[]);
            var sampleController = function($scope) {
                $scope.onChange = function() {
                    $scope.eventResult = '『' + $scope.inputValue + '』と入力されました。';
                };
            };
            mainModule.controller('sampleController', ['$scope', sampleController]);
        </script>
    </head>
    <body ng-controller="sampleController">
        <input type="checkbox" ng-model="inputValue" ng-change="onChange()" />
        {{eventResult}}
    </body>
</html>

4.ダウンロードした『angular.min.js』と『index.html』を同一ディレクトリに配置します。
5.『index.html』をブラウザで開きます。
6.以下の様に表示されれば成功です。


以上です。

テキストボックスのチェンジイベント

【目的】
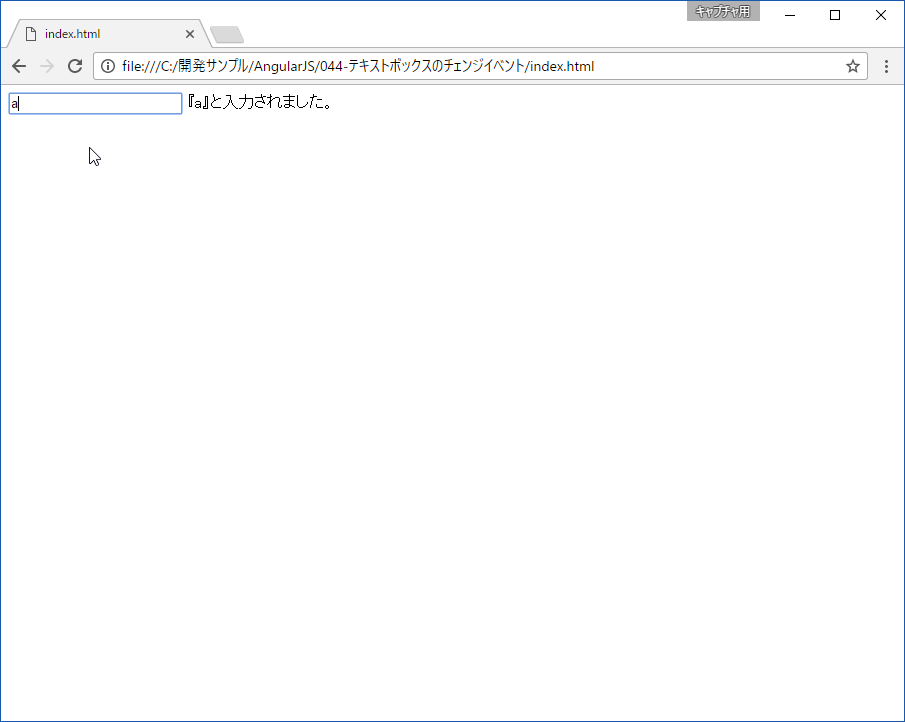
AngularJSで、テキストボックスのチェンジイベントを使います。


【手順】
1.『AngularJS1.5.8のダウンロード方法』の手順で、AngularJS1.5.8をダウンロードしておきます。
2.『index.html』というファイルを作成。
3.『index.html』を以下の様に入力。
<!doctype html>
<html ng-app="mainModule">
    <head>
        <script src="angular.min.js"></script>
        <script>
            var mainModule = angular.module('mainModule',[]);
            var sampleController = function($scope) {
                $scope.onChange = function() {
                    $scope.eventResult = '『' + $scope.inputValue + '』と入力されました。';
                };
            };
            mainModule.controller('sampleController', ['$scope', sampleController]);
        </script>
    </head>
    <body ng-controller="sampleController">
        <input type="text" ng-model="inputValue" ng-change="onChange()" />
        {{eventResult}}
    </body>
</html>

4.ダウンロードした『angular.min.js』と『index.html』を同一ディレクトリに配置します。
5.『index.html』をブラウザで開きます。
6.以下の様に表示されれば成功です。


以上です。
キーイベント(Press)

【目的】
AngularJSで、キーイベントのPressを使います。


【手順】
1.『AngularJS1.5.8のダウンロード方法』の手順で、AngularJS1.5.8をダウンロードしておきます。
2.『index.html』というファイルを作成。
3.『index.html』を以下の様に入力。
<!doctype html>
<html ng-app="mainModule">
    <head>
        <script src="angular.min.js"></script>
        <script>
            var mainModule = angular.module('mainModule',[]);
            var sampleController = function($scope) {
                $scope.onKeyPress = function() {
                    $scope.eventResult = 'キーが押されました。';
                };
            };
            mainModule.controller('sampleController', ['$scope', sampleController]);
        </script>
    </head>
    <body ng-controller="sampleController">
        <input type="text" ng-keypress="onKeyPress()" />
        {{eventResult}}
    </body>
</html>

4.ダウンロードした『angular.min.js』と『index.html』を同一ディレクトリに配置します。
5.『index.html』をブラウザで開きます。
6.以下の様に表示されれば成功です。


以上です。

キーイベント(Up・Down)

【目的】
AngularJSで、キーイベントのUp・Downを使います。


【手順】
1.『AngularJS1.5.8のダウンロード方法』の手順で、AngularJS1.5.8をダウンロードしておきます。
2.『index.html』というファイルを作成。
3.『index.html』を以下の様に入力。
<!doctype html>
<html ng-app="mainModule">
    <head>
        <script src="angular.min.js"></script>
        <script>
            var mainModule = angular.module('mainModule',[]);
            var sampleController = function($scope) {
                $scope.onKeyUp = function() {
                    $scope.eventResult = 'キーがアップされました。';
                };
                $scope.onKeyDown = function() {
                    $scope.eventResult = 'キーがダウンされました。';
                };
            };
            mainModule.controller('sampleController', ['$scope', sampleController]);
        </script>
    </head>
    <body ng-controller="sampleController">
        <input type="text" ng-keyup="onKeyUp()" ng-keydown="onKeyDown()" />
        {{eventResult}}
    </body>
</html>

4.ダウンロードした『angular.min.js』と『index.html』を同一ディレクトリに配置します。
5.『index.html』をブラウザで開きます。
6.以下の様に表示されれば成功です。


以上です。

マウスイベント(Over)

【目的】
AngularJSで、マウスイベントのOverを使います。


【手順】
1.『AngularJS1.5.8のダウンロード方法』の手順で、AngularJS1.5.8をダウンロードしておきます。
2.『index.html』というファイルを作成。
3.『index.html』を以下の様に入力。
<!doctype html>
<html ng-app="mainModule">
    <head>
        <script src="angular.min.js"></script>
        <script>
            var mainModule = angular.module('mainModule',[]);
            var sampleController = function($scope) {
                $scope.onMouseOver = function() {
                    $scope.eventResult = 'マウスが重なりました。';
                };
            };
            mainModule.controller('sampleController', ['$scope', sampleController]);
        </script>
    </head>
    <body ng-controller="sampleController">
        <div style="width:100px; height:100px; background-color:pink;"
             ng-mouseover="onMouseOver()"></div>
        {{eventResult}}
    </body>
</html>

4.ダウンロードした『angular.min.js』と『index.html』を同一ディレクトリに配置します。
5.『index.html』をブラウザで開きます。
6.以下の様に表示されれば成功です。


以上です。

マウスイベント(Move)

【目的】
AngularJSで、マウスイベントのMoveを使います。


【手順】
1.『AngularJS1.5.8のダウンロード方法』の手順で、AngularJS1.5.8をダウンロードしておきます。
2.『index.html』というファイルを作成。
3.『index.html』を以下の様に入力。
<!doctype html>
<html ng-app="mainModule">
    <head>
        <script src="angular.min.js"></script>
        <script>
            var mainModule = angular.module('mainModule',[]);
            var sampleController = function($scope) {
                $scope.onMouseMove = function() {
                    $scope.eventResult = 'マウスが移動されました。';
                };
            };
            mainModule.controller('sampleController', ['$scope', sampleController]);
        </script>
    </head>
    <body ng-controller="sampleController">
        <div style="width:100px; height:100px; background-color:pink;"
             ng-mousemove="onMouseMove()"></div>
        {{eventResult}}
    </body>
</html>

4.ダウンロードした『angular.min.js』と『index.html』を同一ディレクトリに配置します。
5.『index.html』をブラウザで開きます。
6.以下の様に表示されれば成功です。


以上です。

マウスイベント(Enter・Leave)

【目的】
AngularJSで、マウスイベントのEnter・Leaveを使います。


【手順】
1.『AngularJS1.5.8のダウンロード方法』の手順で、AngularJS1.5.8をダウンロードしておきます。
2.『index.html』というファイルを作成。
3.『index.html』を以下の様に入力。
<!doctype html>
<html ng-app="mainModule">
    <head>
        <script src="angular.min.js"></script>
        <script>
            var mainModule = angular.module('mainModule',[]);
            var sampleController = function($scope) {
                $scope.onMouseEnter = function() {
                    $scope.eventResult = 'マウスが入りました。';
                };
                $scope.onMouseLeave = function() {
                    $scope.eventResult = 'マウスが出ました。';
                };
            };
            mainModule.controller('sampleController', ['$scope', sampleController]);
        </script>
    </head>
    <body ng-controller="sampleController">
        <div style="width:100px; height:100px; background-color:pink;"
             ng-mouseenter="onMouseEnter()"
             ng-mouseleave="onMouseLeave()"></div>
        {{eventResult}}
    </body>
</html>

4.ダウンロードした『angular.min.js』と『index.html』を同一ディレクトリに配置します。
5.『index.html』をブラウザで開きます。
6.以下の様に表示されれば成功です。


以上です。

マウスイベント(Up・Down)

【目的】
AngularJSで、マウスイベントのUP・Downを使います。


【手順】
1.『AngularJS1.5.8のダウンロード方法』の手順で、AngularJS1.5.8をダウンロードしておきます。
2.『index.html』というファイルを作成。
3.『index.html』を以下の様に入力。
<!doctype html>
<html ng-app="mainModule">
    <head>
        <script src="angular.min.js"></script>
        <script>
            var mainModule = angular.module('mainModule',[]);
            var sampleController = function($scope) {
                $scope.onMouseUp = function() {
                    $scope.eventResult = 'マウスがアップされました。';
                };
                $scope.onMouseDown = function() {
                    $scope.eventResult = 'マウスがダウンされました。';
                };
            };
            mainModule.controller('sampleController', ['$scope', sampleController]);
        </script>
    </head>
    <body ng-controller="sampleController">
        <div style="width:100px; height:100px; background-color:pink;"
             ng-mouseup="onMouseUp()"
             ng-mousedown="onMouseDown()"></div>
        {{eventResult}}
    </body>
</html>

4.ダウンロードした『angular.min.js』と『index.html』を同一ディレクトリに配置します。
5.『index.html』をブラウザで開きます。
6.以下の様に表示されれば成功です。


以上です。

ボタンのダブルクリックイベント

【目的】
AngularJSで、ボタンのダブルクリックイベントを使用します。


【手順】
1.『AngularJS1.5.8のダウンロード方法』の手順で、AngularJS1.5.8をダウンロードしておきます。
2.『index.html』というファイルを作成。
3.『index.html』を以下の様に入力。
<!doctype html>
<html ng-app="mainModule">
    <head>
        <script src="angular.min.js"></script>
        <script>
            var mainModule = angular.module('mainModule',[]);
            var sampleController = function($scope) {
                $scope.onButtonDblClick = function() {
                    $scope.clickResult = 'ダブルクリックされました。';
                };
            };
            mainModule.controller('sampleController', ['$scope', sampleController]);
        </script>
    </head>
    <body ng-controller="sampleController">
        <button ng-dblclick="onButtonDblClick()">ボタン</button>
        {{clickResult}}
    </body>
</html>

4.ダウンロードした『angular.min.js』と『index.html』を同一ディレクトリに配置します。
5.『index.html』をブラウザで開きます。
6.以下の様に表示されれば成功です。


以上です。

ボタンのクリックイベント(引数付き)

【目的】
AngularJSで、ボタンのクリックイベントを使用します(引数付き)。


【手順】
1.『AngularJS1.5.8のダウンロード方法』の手順で、AngularJS1.5.8をダウンロードしておきます。
2.『index.html』というファイルを作成。
3.『index.html』を以下の様に入力。
<!doctype html>
<html ng-app="mainModule">
    <head>
        <script src="angular.min.js"></script>
        <script>
            var mainModule = angular.module('mainModule',[]);
            var sampleController = function($scope) {
                $scope.onButtonClick = function(value) {
                    $scope.clickResult = '『' + value + '』と入力されました。';
                };
            };
            mainModule.controller('sampleController', ['$scope', sampleController]);
        </script>
    </head>
    <body ng-controller="sampleController">
        <input type="text" ng-model="inputValue">
        <button ng-click="onButtonClick(inputValue)">ボタン</button>
        {{clickResult}}
    </body>
</html>

4.ダウンロードした『angular.min.js』と『index.html』を同一ディレクトリに配置します。
5.『index.html』をブラウザで開きます。
6.以下の様に表示されれば成功です。


以上です。

ボタンのクリックイベント

【目的】
AngularJSで、ボタンのクリックイベントを使用します。


【手順】
1.『AngularJS1.5.8のダウンロード方法』の手順で、AngularJS1.5.8をダウンロードしておきます。
2.『index.html』というファイルを作成。
3.『index.html』を以下の様に入力。<!doctype html>
<html ng-app="mainModule">
    <head>
        <script src="angular.min.js"></script>
        <script>
            var mainModule = angular.module('mainModule',[]);
            var sampleController = function($scope) {
                $scope.onButtonClick = function() {
                    $scope.clickResult = 'クリックされました。';
                };
            };
            mainModule.controller('sampleController', ['$scope', sampleController]);
        </script>
    </head>
    <body ng-controller="sampleController">
        <button ng-click="onButtonClick()">ボタン</button>
        {{clickResult}}
    </body>
</html>

4.ダウンロードした『angular.min.js』と『index.html』を同一ディレクトリに配置します。
5.『index.html』をブラウザで開きます。
6.以下の様に表示されれば成功です。


以上です。

2016年10月18日火曜日

フォームのテキストボックスの入力が正常かどうか確認

【目的】
AngularJSで、フォームのテキストボックスの入力が正常かどうか取得します。


【手順】
1.『AngularJS1.5.8のダウンロード方法』の手順で、AngularJS1.5.8をダウンロードしておきます。
2.『index.html』というファイルを作成。
3.『index.html』を以下の様に入力。
<!doctype html>
<html ng-app>
    <head>
        <script src="angular.min.js"></script>
    </head>
    <body>
        <form name="sampleForm">
            <input type="text" name="textInput" ng-model="textInputValue" required ng-minlength="2" ng-maxlength="4" ng-pattern="/^[a-zA-Z]+$/" />
            <span ng-if="sampleForm.textInput.$valid">正常です。</span>
            <span ng-if="sampleForm.textInput.$invalid">異常です。</span>
        </form>
    </body>
</html>

4.ダウンロードした『angular.min.js』と『index.html』を同一ディレクトリに配置します。
5.『index.html』をブラウザで開きます。
6.以下の様に表示されれば成功です。


以上です。

フォームのテキストボックスの入力パターンのエラー取得

【目的】
AngularJSで、フォームのテキストボックスの入力パターンのエラーを取得します。


【手順】
1.『AngularJS1.5.8のダウンロード方法』の手順で、AngularJS1.5.8をダウンロードしておきます。
2.『index.html』というファイルを作成。
3.『index.html』を以下の様に入力。
<!doctype html>
<html ng-app>
    <head>
        <script src="angular.min.js"></script>
    </head>
    <body>
        <form name="sampleForm">
            <input type="text" name="textInput" ng-model="textInputValue" ng-pattern="/^[a-zA-Z]+$/" />
            <span ng-if="sampleForm.textInput.$error.pattern">英文字のみ入力できます。</span>
        </form>
    </body>
</html>

4.ダウンロードした『angular.min.js』と『index.html』を同一ディレクトリに配置します。
5.『index.html』をブラウザで開きます。
6.以下の様に表示されれば成功です。


以上です。

フォームのテキストボックスの最小桁・最大桁のエラー取得

【目的】
AngularJSで、フォームのテキストボックスの最小桁・最大桁のエラーを取得します。


【手順】
1.『AngularJS1.5.8のダウンロード方法』の手順で、AngularJS1.5.8をダウンロードしておきます。
2.『index.html』というファイルを作成。
3.『index.html』を以下の様に入力。
<!doctype html>
<html ng-app>
    <head>
        <script src="angular.min.js"></script>
    </head>
    <body>
        <form name="sampleForm">
            <input type="text" name="textInput" ng-model="textInputValue" ng-minlength="2" ng-maxlength="4" />
            <span ng-if="sampleForm.textInput.$error.minlength">2文字以上でないといけません。</span>
            <span ng-if="sampleForm.textInput.$error.maxlength">4文字以下でないといけません。</span>
        </form>
    </body>
</html>

4.ダウンロードした『angular.min.js』と『index.html』を同一ディレクトリに配置します。
5.『index.html』をブラウザで開きます。
6.以下の様に表示されれば成功です。


以上です。

フォームのテキストボックスの必須入力のエラー取得

【目的】
AngularJSで、フォームのテキストボックスの必須入力のエラーを取得します。


【手順】
1.『AngularJS1.5.8のダウンロード方法』の手順で、AngularJS1.5.8をダウンロードしておきます。
2.『index.html』というファイルを作成。
3.『index.html』を以下の様に入力。
<!doctype html>
<html ng-app>
    <head>
        <script src="angular.min.js"></script>
    </head>
    <body>
        <form name="sampleForm">
            <input type="text" name="textInput" ng-model="textInputValue" required>
            <span ng-if="sampleForm.textInput.$error.required">必須入力です。</span>
        </form>
    </body>
</html>

4.ダウンロードした『angular.min.js』と『index.html』を同一ディレクトリに配置します。
5.『index.html』をブラウザで開きます。
6.以下の様に表示されれば成功です。


以上です。

2016年10月17日月曜日

テキストボックスの入力パターンの検証

【目的】
AngularJSで、テキストボックスの入力パターンの検証を行います。


【手順】
1.『AngularJS1.5.8のダウンロード方法』の手順で、AngularJS1.5.8をダウンロードしておきます。
2.『index.html』というファイルを作成。
3.『index.html』を以下の様に入力。
<!doctype html>
<html ng-app>
    <head>
        <script src="angular.min.js"></script>
        <style>
            .ng-valid {
                border: solid blue 5px;
            }
            .ng-invalid {
                border: solid red 5px;
            }
        </style>
    </head>
    <body>
        <input type="text" ng-model="inputValue" required ng-pattern="/^[a-zA-Z]+$/"><br />
        入力された値:{{inputValue}}
    </body>
</html>

4.ダウンロードした『angular.min.js』と『index.html』を同一ディレクトリに配置します。
5.『index.html』をブラウザで開きます。
6.以下の様に表示されれば成功です。


以上です。

テキストボックスの最小桁・最大桁の検証

【目的】
AngularJSで、テキストボックスの最小桁・最大桁の検証を行います。


【手順】
1.『AngularJS1.5.8のダウンロード方法』の手順で、AngularJS1.5.8をダウンロードしておきます。
2.『index.html』というファイルを作成。
3.『index.html』を以下の様に入力。
<!doctype html>
<html ng-app>
    <head>
        <script src="angular.min.js"></script>
        <style>
            .ng-valid {
                border: solid blue 5px;
            }
            .ng-invalid {
                border: solid red 5px;
            }
        </style>
    </head>
    <body>
        <input type="text" ng-model="inputValue" required ng-minlength="2" ng-maxlength="4"><br />
        入力された値:{{inputValue}}
    </body>
</html>

4.ダウンロードした『angular.min.js』と『index.html』を同一ディレクトリに配置します。
5.『index.html』をブラウザで開きます。
6.以下の様に表示されれば成功です。


以上です。

テキストボックスの必須入力の検証

【目的】
AngularJSで、テキストボックスの必須入力の検証を行います。


【手順】
1.『AngularJS1.5.8のダウンロード方法』の手順で、AngularJS1.5.8をダウンロードしておきます。
2.『index.html』というファイルを作成。
3.『index.html』を以下の様に入力。
<!doctype html>
<html ng-app>
    <head>
        <script src="angular.min.js"></script>
        <style>
            .ng-valid {
                border: solid blue 5px;
            }
            .ng-invalid {
                border: solid red 5px;
            }
        </style>
    </head>
    <body>
        <input type="text" ng-model="inputValue" required><br />
        入力された値:{{inputValue}}
    </body>
</html>

4.ダウンロードした『angular.min.js』と『index.html』を同一ディレクトリに配置します。
5.『index.html』をブラウザで開きます。
6.以下の様に表示されれば成功です。


以上です。

2016年10月14日金曜日

フォームが変更されたかどうかの状態

【目的】
AngularJSで、フォームが変更されたかどうかの状態を取得します。


【手順】
1.『AngularJS1.5.8のダウンロード方法』の手順で、AngularJS1.5.8をダウンロードしておきます。
2.『index.html』というファイルを作成。
3.『index.html』を以下の様に入力。
<!doctype html>
<html ng-app="mainModule">
    <head>
        <script src="angular.min.js"></script>
        <script>
            var mainModule = angular.module('mainModule',[]);
            var sampleController = function($scope) {
                $scope.getInputItemState = function(inputItem) {
                    if (inputItem.$pristine) {
                        return "未変更";
                    } else if (inputItem.$dirty) {
                        return "変更あり";
                    } else {
                        return "";
                    }
                };
            };
            mainModule.controller('sampleController', ['$scope', sampleController]);
        </script>
        <style>
            .ng-pristine {
                border: solid orange 5px;
            }
            .ng-dirty {
                border: solid blue 5px;
            }
            form {
                padding: 10px;
            }
        </style>
    </head>
    <body ng-controller="sampleController">
        <form name="sampleForm">
            <input type="text" name="textInput" ng-model="textInputValue" /> 状態:{{getInputItemState(sampleForm.textInput)}}<br />
            <input type="checkbox" name="checkboxInput" ng-model="checkboxInputValue" /> 状態:{{getInputItemState(sampleForm.checkboxInput)}}<br />
            状態:{{getInputItemState(sampleForm)}}
        </form>
    </body>
</html>

4.ダウンロードした『angular.min.js』と『index.html』を同一ディレクトリに配置します。
5.『index.html』をブラウザで開きます。
6.以下の様に表示されれば成功です。


以上です。

フォームのセレクト(グループ化)

【目的】
AngularJSで、フォームのセレクトを扱います。
※値グループ化します。


【手順】
1.『AngularJS1.5.8のダウンロード方法』の手順で、AngularJS1.5.8をダウンロードしておきます。
2.『index.html』というファイルを作成。
3.『index.html』を以下の様に入力。
<!doctype html>
<html ng-app="mainModule">
    <head>
        <script src="angular.min.js"></script>
        <script>
            var mainModule = angular.module('mainModule',[]);
            var sampleController = function($scope) {
                $scope.colorArray = [
                    {name: '赤', english: 'red', kind: '暖色'},
                    {name: '青', english: 'blue', kind: '寒色'},
                    {name: '橙', english: 'orange', kind: '暖色'}
                ];
            };
            mainModule.controller('sampleController', ['$scope', sampleController]);
        </script>
    </head>
    <body ng-controller="sampleController">
        <select ng-model="inputValue" ng-options="color.english as color.name group by color.kind for color in colorArray">
            <option value="">(未選択)</option>
        </select>
        <br />
        選択された値:{{inputValue}}
    </body>
</html>

4.ダウンロードした『angular.min.js』と『index.html』を同一ディレクトリに配置します。
5.『index.html』をブラウザで開きます。
6.以下の様に表示されれば成功です。


以上です。

関連記事