Androidで電源の状態変更をリアルタイムに取得します。
【手順1】
1.「Androidプロジェクトの作成・実行方法(バージョン別一覧)」のAndroidプロジェクトの作成手順で、「AndroidSample46-003-BatteryActionChanged」といプロジェクトを作成。
※プロジェクトの設定は以下の通り。
※他の項目は任意。
| 項目名 | 項目に設定する値 |
| アプリケーション名(Application Name) | com.example.androidsample46_003 |
| プロジェクト名(Project Name) | AndroidSample46-003-BatteryActionChanged |
| パッケージ名(Package Name) | com.example.androidsample46_003 |
| Build SDK | API 8 |
| Minimum Required SDK | API 8 |
【手順2】
1.「AndroidManifest.xml」は以下の通り。
<manifest xmlns:android="http://schemas.android.com/apk/res/android"
    package="com.example.androidsample46_003"
    android:versionCode="1"
    android:versionName="1.0" >

    <uses-sdk
        android:minSdkVersion="8"
        android:targetSdkVersion="8" />

    <application
        android:icon="@drawable/ic_launcher"
        android:label="@string/app_name"
        android:theme="@style/AppTheme" >
        <activity
            android:name="com.example.androidsample46_003.MainActivity"
            android:label="@string/title_activity_main" >
            <intent-filter>
                <action android:name="android.intent.action.MAIN" />

                <category android:name="android.intent.category.LAUNCHER" />
            </intent-filter>
        </activity>
    </application>

</manifest>
2.「Ctrl+Shift+F」を押し、コードをフォーマッティング。3.「Ctrl+S」を押し、ファイルを保存。
【手順3】
1.「res/layout/activity_main.xml」は以下の通り。
<LinearLayout xmlns:android="http://schemas.android.com/apk/res/android"
    android:layout_width="match_parent"
    android:layout_height="match_parent"
    android:orientation="vertical" >

    <TextView
        android:id="@+id/text"
        android:layout_width="wrap_content"
        android:layout_height="wrap_content" />

</LinearLayout>
2.「Ctrl+Shift+F」を押し、コードをフォーマッティング。3.「Ctrl+S」を押し、ファイルを保存。
【手順4】
1.「src/com/example/androidsample46_003/MainActivity.java」は以下の通り。
package com.example.androidsample46_003;

import android.app.Activity;
import android.content.BroadcastReceiver;
import android.content.Context;
import android.content.Intent;
import android.content.IntentFilter;
import android.os.BatteryManager;
import android.os.Bundle;
import android.widget.TextView;

public class MainActivity extends Activity {
    @Override
    public void onCreate(Bundle savedInstanceState) {
        super.onCreate(savedInstanceState);
        setContentView(R.layout.activity_main);
    }
    @Override
    protected void onResume() {
        super.onResume();

        IntentFilter filter = new IntentFilter();
        filter.addAction(Intent.ACTION_BATTERY_CHANGED);
        registerReceiver(broadcastReceiver, filter);
    }

    @Override
    protected void onPause() {
        super.onPause();

        unregisterReceiver(broadcastReceiver);
    }

    private BroadcastReceiver broadcastReceiver = new BroadcastReceiver() {
        @Override
        public void onReceive(Context context, Intent intent) {
            if (intent.getAction().equals(Intent.ACTION_BATTERY_CHANGED)) {
                StringBuilder sb = new StringBuilder();

                boolean present = intent.getBooleanExtra(BatteryManager.EXTRA_PRESENT, false);
                if (present) {
                    sb.append("バッテリーが存在する?=YES");
                } else {
                    sb.append("バッテリーが存在する?=NO");
                }
                sb.append("\n");

                int scale = intent.getIntExtra(BatteryManager.EXTRA_SCALE, -1);
                sb.append("最大バッテリーレベル=" + scale);
                sb.append("\n");

                int level = intent.getIntExtra(BatteryManager.EXTRA_LEVEL, -1);
                sb.append("現在バッテリーレベル=" + level);
                sb.append("\n");

                String technology = intent.getStringExtra(BatteryManager.EXTRA_TECHNOLOGY);
                sb.append("テクノロジ=" + technology);
                sb.append("\n");

                int temperature = intent.getIntExtra(BatteryManager.EXTRA_TEMPERATURE, -1);
                sb.append("バッテリー温度=" + temperature);
                sb.append("\n");

                int voltage = intent.getIntExtra(BatteryManager.EXTRA_VOLTAGE, -1);
                sb.append("現在電圧=" + voltage);
                sb.append("\n\n");


                int health = intent.getIntExtra(BatteryManager.EXTRA_HEALTH, -1);
                sb.append("バッテリー状態=" + health);
                sb.append("\n");

                if (health == BatteryManager.BATTERY_HEALTH_DEAD) {
                    sb.append(" 死亡?=YES");
                } else {
                    sb.append(" 死亡?=NO");
                }
                sb.append("\n");

                if (health == BatteryManager.BATTERY_HEALTH_GOOD) {
                    sb.append(" 良い?=YES");
                } else {
                    sb.append(" 良い?=NO");
                }
                sb.append("\n");

                if (health == BatteryManager.BATTERY_HEALTH_OVERHEAT) {
                    sb.append(" オーバーヒート?=YES");
                } else {
                    sb.append(" オーバーヒート?=NO");
                }
                sb.append("\n");

                if (health == BatteryManager.BATTERY_HEALTH_OVER_VOLTAGE) {
                    sb.append(" 電圧オーバー?=YES");
                } else {
                    sb.append(" 電圧オーバー?=NO");
                }
                sb.append("\n");

                if (health == BatteryManager.BATTERY_HEALTH_UNKNOWN) {
                    sb.append(" 不明?=YES");
                } else {
                    sb.append(" 不明?=NO");
                }
                sb.append("\n");

                if (health == BatteryManager.BATTERY_HEALTH_UNSPECIFIED_FAILURE) {
                    sb.append(" 不明な失敗?=YES");
                } else {
                    sb.append(" 不明な失敗?=NO");
                }
                sb.append("\n\n");


                int status = intent.getIntExtra(BatteryManager.EXTRA_STATUS, -1);
                sb.append("バッテリーステータス=" + status);
                sb.append("\n");

                if (status == BatteryManager.BATTERY_STATUS_CHARGING) {
                    sb.append(" 充電中?=YES");
                } else {
                    sb.append(" 充電中?=NO");
                }
                sb.append("\n");

                if (status == BatteryManager.BATTERY_STATUS_DISCHARGING) {
                    sb.append(" 放電中?=YES");
                } else {
                    sb.append(" 放電中?=NO");
                }
                sb.append("\n");

                if (status == BatteryManager.BATTERY_STATUS_FULL) {
                    sb.append(" 電池100%?=YES");
                } else {
                    sb.append(" 電池100%?=NO");
                }
                sb.append("\n");

                if (status == BatteryManager.BATTERY_STATUS_UNKNOWN) {
                    sb.append(" 不明?=YES");
                } else {
                    sb.append(" 不明?=NO");
                }
                sb.append("\n\n");


                int plugged = intent.getIntExtra(BatteryManager.EXTRA_PLUGGED, -1);
                sb.append("接続=" + plugged);
                sb.append("\n");

                if (plugged == BatteryManager.BATTERY_PLUGGED_USB) {
                    sb.append(" USB接続?=YES");
                } else {
                    sb.append(" USB接続?=NO");
                }
                sb.append("\n");

                if (plugged == BatteryManager.BATTERY_PLUGGED_AC) {
                    sb.append(" 電源接続?=YES");
                } else {
                    sb.append(" 電源接続?=NO");
                }
                sb.append("\n");

                ((TextView) findViewById(R.id.text)).setText(sb);
            }
        }
    };

}
2.「Ctrl+Shift+F」を押し、コードをフォーマッティング。3.「Ctrl+S」を押し、ファイルを保存。
【手順5】
1.「Androidプロジェクトの作成・実行方法(バージョン別一覧)」のAndroidプロジェクトの実行手順で、実行。
【手順6】
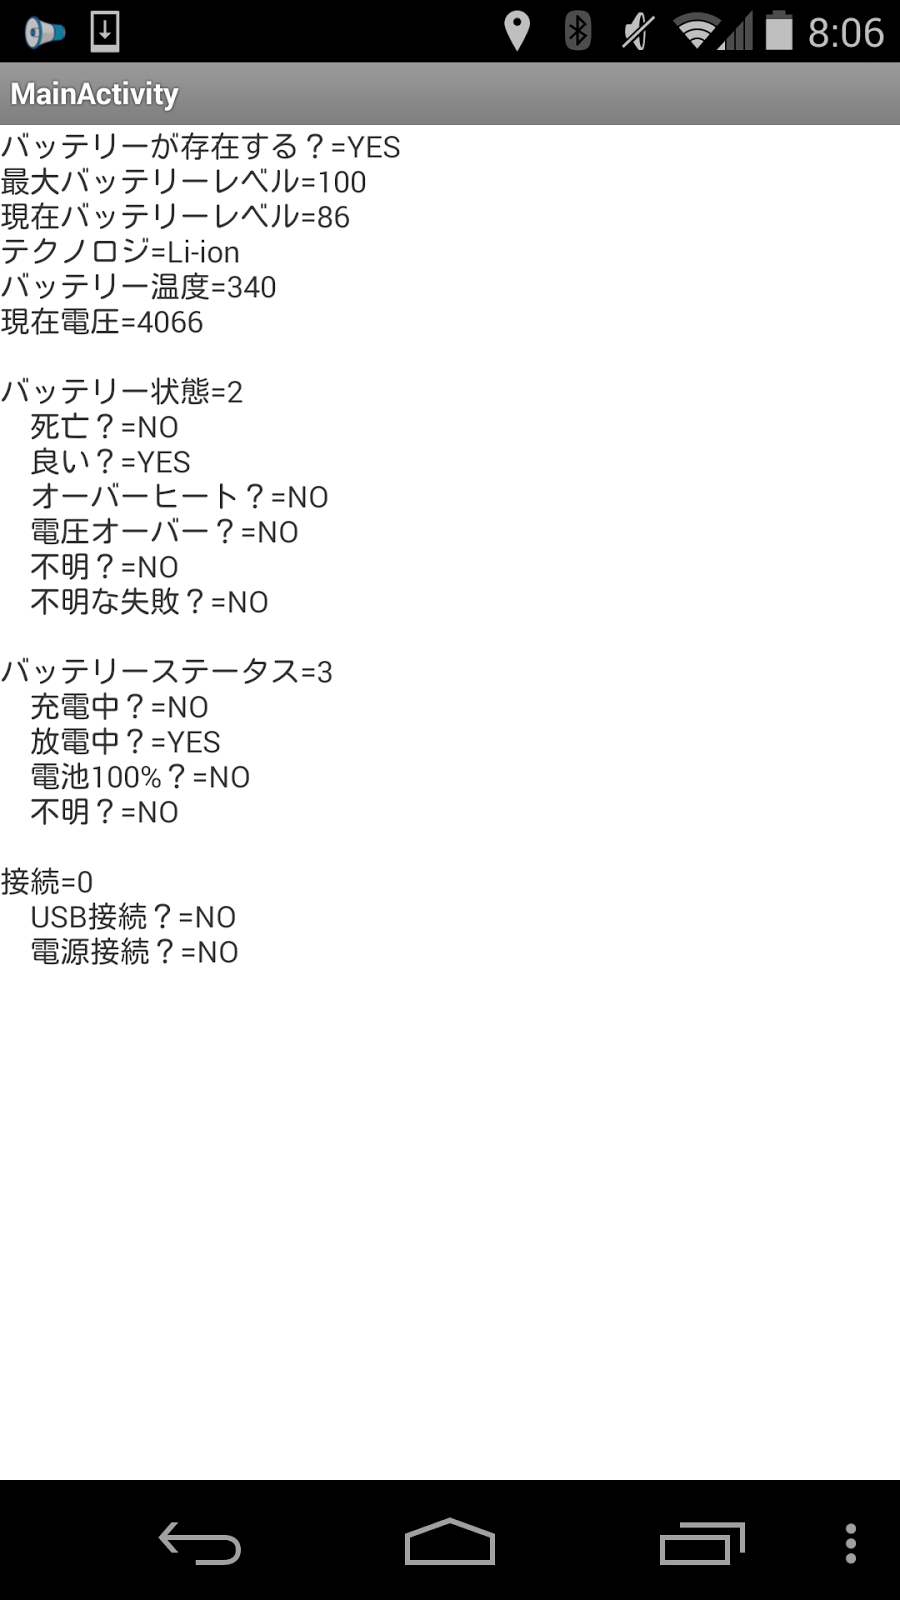
1.以下の様に表示されれば成功です。
↓microUSBで接続した状態。

↓microUSBを抜いた状態。
以上です。


-01.png)
-02.png)
-03.png)
-04.png)
-05.png)
-01.png)
-01.png)