最近の更新

2013年10月31日木曜日

DIVを最大化する方法

【目的】
jQueryで、DIVを最大化(100%)します。


【手順】
1.「jQuery1.8.1のダウンロード方法」の手順で、jQuery1.8.1をダウンロードしておきます。
2.「031-DIVを最大化.html」というファイルを作成。
3.「031-DIVを最大化.html」を以下の様に入力。
<html>
<head>
    <script type="text/javascript" src="./jquery-1.8.1.min.js"></script>
    <script type="text/javascript">
    $(function(){
        $("#button1").click(function(){
            $("#area1").width("100%");
            $("#area1").height("100%");
        });
    })
    </script>
</head>
<body>
    <div id="area1" style="width:100px; height:100px; background-color:red;">
        中身
    </div>
    <input id="button1" type="button" value="最大化">
</body>
</html>

4.ダウンロードした「jquery-1.8.1.min.js」と「031-DIVを最大化.html」を同一ディレクトリに配置します。
5.「031-DIVを最大化.html」をブラウザで開きます。
6.以下の様に表示されれば成功です。


以上です。

2013年10月30日水曜日

DIVの中身に出力する方法

【目的】
jQueryで、DIVの中身に出力します。


【手順】
1.「jQuery1.8.1のダウンロード方法」の手順で、jQuery1.8.1をダウンロードしておきます。
2.「030-DIVの中身に出力.html」というファイルを作成。
3.「030-DIVの中身に出力.html」を以下の様に入力。
<html>
<head>
    <script type="text/javascript" src="./jquery-1.8.1.min.js"></script>
    <script type="text/javascript">
    $(function(){
        $("#button1").click(function(){
            $("#area1").html("中身を変更しました。");
        });
    })
    </script>
</head>
<body>
    <div id="area1" style="width:100px; height:100px; background-color:red;">
        中身
    </div>
    <input id="button1" type="button" value="出力">
</body>
</html>

4.ダウンロードした「jquery-1.8.1.min.js」と「030-DIVの中身に出力.html」を同一ディレクトリに配置します。
5.「030-DIVの中身に出力.html」をブラウザで開きます。
6.以下の様に表示されれば成功です。


以上です。

DIVの中身を取得

【目的】
jQueryで、DIVの中身を取得します。


【手順】
1.「jQuery1.8.1のダウンロード方法」の手順で、jQuery1.8.1をダウンロードしておきます。
2.「029-DIVの中身を取得.html」というファイルを作成。
3.「029-DIVの中身を取得.html」を以下の様に入力。
<html>
<head>
    <script type="text/javascript" src="./jquery-1.8.1.min.js"></script>
    <script type="text/javascript">
    $(function(){
        $("#button1").click(function(){
            alert($("#area1").html());
        });
    })
    </script>
</head>
<body>
    <div id="area1" style="width:100px; height:100px; background-color:red;">
        中身
    </div>
    <input id="button1" type="button" value="出力">
</body>
</html>

4.ダウンロードした「jquery-1.8.1.min.js」と「029-DIVの中身を取得.html」を同一ディレクトリに配置します。
5.「029-DIVの中身を取得.html」をブラウザで開きます。
6.以下の様に表示されれば成功です。


以上です。

ポップオーバー(1つだけ開く)

【目的】
Twitter Bootstrap2.3.1でポップオーバーを1つだけ開くようにします。


【準備】
1.「Twitter Bootstrap2.3.1の使用方法」の手順の通り、Twitter Bootstrapを配置しておきます。


【手順1】
1.HTMLファイル「index.html」(任意)を作成。
2.「index.html」を以下の様に入力。
<!DOCTYPE html>
<html>
    <head>
        <link href="bootstrap/css/bootstrap.min.css" rel="stylesheet" />
    </head>
    <body>
        <a href="#" class="btn popover-test" title="タイトル" data-placement="bottom" data-content="1つ目">ポップオーバー1</a>
        <a href="#" class="btn popover-test" title="タイトル" data-placement="bottom" data-content="2つ目">ポップオーバー2</a>
        <a href="#" class="btn popover-test" title="タイトル" data-placement="bottom" data-content="3つ目">ポップオーバー3</a>

        <script src="http://code.jquery.com/jquery.js"></script>
        <script src="bootstrap/js/bootstrap.min.js"></script>
        <script>
            $('.popover-test').popover();
            $('.popover-test').click(function(){
                $('.popover-test').not(this).popover('hide');
            });
        </script>
    </body>
</html>


【手順2】
1.ブラウザで「index.html」を開き、以下の様に表示されれば成功です。


以上です。

YouTubeAPIPlayerStateChange

【目的】
AndroidでYouTubeAPIを使用してYouTubeの動画のプレイヤーの状態変更(PlayerStateChange)を取得します。


【準備】
1.「Google APIsのYouTube Data API v3のAPIキーを取得する方法」の手順で、「YouTube Data API v3」のAPIキーを取得しておきます。
※APIキーの取得に指定するパッケージ名は「com.example.androidsample44_009」です。


【手順1】
1.「Androidプロジェクトの作成・実行方法(バージョン別一覧)」のAndroidプロジェクトの作成手順で、「AndroidSample44-009-YouTubeAPIPlayerStateChange」といプロジェクトを作成。
※プロジェクトの設定は以下の通り。
※他の項目は任意。
項目名 項目に設定する値
アプリケーション名(Application Name) com.example.androidsample44_009
プロジェクト名(Project Name) AndroidSample44-009-YouTubeAPIPlayerStateChange
パッケージ名(Package Name) com.example.androidsample44_009
Build SDK API 8
Minimum Required SDK API 8

2.「YouTube Android Player API 1.0.0をライブラリに設定する方法」の手順でライブラリを設定。


【手順2】
1.「AndroidManifest.xml」は以下の通り。
<manifest xmlns:android="http://schemas.android.com/apk/res/android"
    package="com.example.androidsample44_009"
    android:versionCode="1"
    android:versionName="1.0" >

    <uses-sdk
        android:minSdkVersion="8"
        android:targetSdkVersion="8" />

    <uses-permission android:name="android.permission.INTERNET" />

    <application
        android:icon="@drawable/ic_launcher"
        android:label="@string/app_name"
        android:theme="@style/AppTheme" >
        <activity
            android:name="com.example.androidsample44_009.MainActivity"
            android:label="@string/title_activity_main" >
            <intent-filter>
                <action android:name="android.intent.action.MAIN" />

                <category android:name="android.intent.category.LAUNCHER" />
            </intent-filter>
        </activity>
    </application>

</manifest>
2.「Ctrl+Shift+F」を押し、コードをフォーマッティング。
3.「Ctrl+S」を押し、ファイルを保存。


【手順3】
1.「res/layout/activity_main.xml」は以下の通り。
<LinearLayout xmlns:android="http://schemas.android.com/apk/res/android"
    android:layout_width="match_parent"
    android:layout_height="match_parent"
    android:orientation="vertical" >

    <com.google.android.youtube.player.YouTubePlayerView
        android:id="@+id/youtube_view"
        android:layout_width="match_parent"
        android:layout_height="wrap_content" />

    <Button
        android:layout_width="wrap_content"
        android:layout_height="wrap_content"
        android:onClick="onClickButtonPlay"
        android:text="開始" />

    <Button
        android:layout_width="wrap_content"
        android:layout_height="wrap_content"
        android:onClick="onClickButtonPause"
        android:text="停止" />

    <TextView
        android:id="@+id/text"
        android:layout_width="match_parent"
        android:layout_height="match_parent" />

</LinearLayout>
2.「Ctrl+Shift+F」を押し、コードをフォーマッティング。
3.「Ctrl+S」を押し、ファイルを保存。


【手順4】
1.「src/com/example/androidsample44_009/MainActivity.java」は以下の通り。
package com.example.androidsample44_009;

import android.content.Intent;
import android.os.Bundle;
import android.view.View;
import android.widget.TextView;
import android.widget.Toast;

import com.google.android.youtube.player.YouTubeBaseActivity;
import com.google.android.youtube.player.YouTubeInitializationResult;
import com.google.android.youtube.player.YouTubePlayer;
import com.google.android.youtube.player.YouTubePlayer.ErrorReason;
import com.google.android.youtube.player.YouTubePlayer.PlayerStateChangeListener;
import com.google.android.youtube.player.YouTubePlayerView;

public class MainActivity extends YouTubeBaseActivity implements YouTubePlayer.OnInitializedListener {
    private static final String DEVELOPER_KEY = "YOUR_OWN_KEY";
    private static final String VIDEO_ID = "TougVsqHIVg";
    private static final String INIT_ERROR_MESSAGE = "初期化に失敗しました。 (%1$s)";
    private static final int RECOVERY_DIALOG_REQUEST = 1;
    private YouTubePlayer player;

    @Override
    public void onCreate(Bundle savedInstanceState) {
        super.onCreate(savedInstanceState);
        setContentView(R.layout.activity_main);
        initYouTubeView();
    }

    @Override
    protected void onActivityResult(int requestCode, int resultCode, Intent data) {
        if (requestCode == RECOVERY_DIALOG_REQUEST) {
            initYouTubeView();
        }
    }

    public void onInitializationFailure(YouTubePlayer.Provider provider, YouTubeInitializationResult errorReason) {
        if (errorReason.isUserRecoverableError()) {
            errorReason.getErrorDialog(this, RECOVERY_DIALOG_REQUEST).show();
        } else {
            String errorMessage = String.format(INIT_ERROR_MESSAGE, errorReason.toString());
            Toast.makeText(this, errorMessage, Toast.LENGTH_LONG).show();
        }
    }

    public void onInitializationSuccess(YouTubePlayer.Provider provider, YouTubePlayer player, boolean wasRestored) {
        this.player = player;
        this.player.setPlayerStateChangeListener(new PlayerStateChangeListener() {
            public void onVideoStarted() {
                setText("onVideoStarted");
            }

            public void onVideoEnded() {
                setText("onVideoEnded");
            }

            public void onLoading() {
                setText("onLoading");
            }

            public void onLoaded(String arg0) {
                setText("onLoaded");
            }

            public void onError(ErrorReason arg0) {
                setText("onError");
            }

            public void onAdStarted() {
                setText("onAdStarted");
            }
            private void setText(String event) {
                TextView text = (TextView) findViewById(R.id.text);
                text.setText(event + "\n" + text.getText());
            }
        });
        if (!wasRestored) {
            player.cueVideo(VIDEO_ID);
        }
    }

    private void initYouTubeView() {
        YouTubePlayerView youTubeView = (YouTubePlayerView) findViewById(R.id.youtube_view);
        youTubeView.initialize(DEVELOPER_KEY, this);
    }

    public void onClickButtonPause(View view) {
        this.player.pause();
    }

    public void onClickButtonPlay(View view) {
        this.player.play();
    }
}
2.「YOUR_OWN_KEY」を【準備】で取得しておいた、APIキーに変更。
3.「Ctrl+Shift+F」を押し、コードをフォーマッティング。
4.「Ctrl+S」を押し、ファイルを保存。


【手順5】
1.「Androidプロジェクトの作成・実行方法(バージョン別一覧)」のAndroidプロジェクトの実行手順で、実行。


【手順6】
1.以下の様に表示されれば成功です。


以上です。

YouTubeAPIPlaylistEvent

【目的】
AndroidでYouTubeAPIを使用してYouTubeの動画のプレイリストのイベント(PlaylistEvent)を取得します。


【準備】
1.「Google APIsのYouTube Data API v3のAPIキーを取得する方法」の手順で、「YouTube Data API v3」のAPIキーを取得しておきます。
※APIキーの取得に指定するパッケージ名は「com.example.androidsample44_008」です。


【手順1】
1.「Androidプロジェクトの作成・実行方法(バージョン別一覧)」のAndroidプロジェクトの作成手順で、「AndroidSample44-008-YouTubeAPIPlaylistEvent」といプロジェクトを作成。
※プロジェクトの設定は以下の通り。
※他の項目は任意。
項目名 項目に設定する値
アプリケーション名(Application Name) com.example.androidsample44_008
プロジェクト名(Project Name) AndroidSample44-008-YouTubeAPIPlaylistEvent
パッケージ名(Package Name) com.example.androidsample44_008
Build SDK API 8
Minimum Required SDK API 8

2.「YouTube Android Player API 1.0.0をライブラリに設定する方法」の手順でライブラリを設定。


【手順2】
1.「AndroidManifest.xml」は以下の通り。
<manifest xmlns:android="http://schemas.android.com/apk/res/android"
    package="com.example.androidsample44_008"
    android:versionCode="1"
    android:versionName="1.0" >

    <uses-sdk
        android:minSdkVersion="8"
        android:targetSdkVersion="8" />

    <uses-permission android:name="android.permission.INTERNET" />

    <application
        android:icon="@drawable/ic_launcher"
        android:label="@string/app_name"
        android:theme="@style/AppTheme" >
        <activity
            android:name="com.example.androidsample44_008.MainActivity"
            android:label="@string/title_activity_main" >
            <intent-filter>
                <action android:name="android.intent.action.MAIN" />

                <category android:name="android.intent.category.LAUNCHER" />
            </intent-filter>
        </activity>
    </application>

</manifest>
2.「Ctrl+Shift+F」を押し、コードをフォーマッティング。
3.「Ctrl+S」を押し、ファイルを保存。


【手順3】
1.「res/layout/activity_main.xml」は以下の通り。
<LinearLayout xmlns:android="http://schemas.android.com/apk/res/android"
    android:layout_width="match_parent"
    android:layout_height="match_parent"
    android:orientation="vertical" >

    <com.google.android.youtube.player.YouTubePlayerView
        android:id="@+id/youtube_view"
        android:layout_width="match_parent"
        android:layout_height="wrap_content" />

    <Button
        android:layout_width="wrap_content"
        android:layout_height="wrap_content"
        android:onClick="onClickButtonPlay"
        android:text="開始" />

    <Button
        android:layout_width="wrap_content"
        android:layout_height="wrap_content"
        android:onClick="onClickButtonPause"
        android:text="停止" />

    <TextView
        android:id="@+id/text"
        android:layout_width="match_parent"
        android:layout_height="match_parent" />

</LinearLayout>
2.「Ctrl+Shift+F」を押し、コードをフォーマッティング。
3.「Ctrl+S」を押し、ファイルを保存。


【手順4】
1.「src/com/example/androidsample44_008/MainActivity.java」は以下の通り。
package com.example.androidsample44_008;

import android.content.Intent;
import android.os.Bundle;
import android.view.View;
import android.widget.TextView;
import android.widget.Toast;

import com.google.android.youtube.player.YouTubeBaseActivity;
import com.google.android.youtube.player.YouTubeInitializationResult;
import com.google.android.youtube.player.YouTubePlayer;
import com.google.android.youtube.player.YouTubePlayer.PlaylistEventListener;
import com.google.android.youtube.player.YouTubePlayerView;

public class MainActivity extends YouTubeBaseActivity implements YouTubePlayer.OnInitializedListener {
    private static final String DEVELOPER_KEY = "YOUR_OWN_KEY";
    private static final String PLAYLIST_ID = "PLPTphZRRM3oUo7JUdbyE-q0V9orGvU7Ug";
    private static final String INIT_ERROR_MESSAGE = "初期化に失敗しました。 (%1$s)";
    private static final int RECOVERY_DIALOG_REQUEST = 1;
    private YouTubePlayer player;

    @Override
    public void onCreate(Bundle savedInstanceState) {
        super.onCreate(savedInstanceState);
        setContentView(R.layout.activity_main);
        initYouTubeView();
    }

    @Override
    protected void onActivityResult(int requestCode, int resultCode, Intent data) {
        if (requestCode == RECOVERY_DIALOG_REQUEST) {
            initYouTubeView();
        }
    }

    public void onInitializationFailure(YouTubePlayer.Provider provider, YouTubeInitializationResult errorReason) {
        if (errorReason.isUserRecoverableError()) {
            errorReason.getErrorDialog(this, RECOVERY_DIALOG_REQUEST).show();
        } else {
            String errorMessage = String.format(INIT_ERROR_MESSAGE, errorReason.toString());
            Toast.makeText(this, errorMessage, Toast.LENGTH_LONG).show();
        }
    }

    public void onInitializationSuccess(YouTubePlayer.Provider provider, YouTubePlayer player, boolean wasRestored) {
        this.player = player;
        this.player.setPlaylistEventListener(new PlaylistEventListener() {
            public void onPrevious() {
                setText("onPrevious");
            }

            public void onPlaylistEnded() {
                setText("onPlaylistEnded");
            }

            public void onNext() {
                setText("onNext");
            }

            private void setText(String event) {
                TextView text = (TextView) findViewById(R.id.text);
                text.setText(event + "\n" + text.getText());
            }
        });
        if (!wasRestored) {
            player.cuePlaylist(PLAYLIST_ID);
        }
    }

    private void initYouTubeView() {
        YouTubePlayerView youTubeView = (YouTubePlayerView) findViewById(R.id.youtube_view);
        youTubeView.initialize(DEVELOPER_KEY, this);
    }

    public void onClickButtonPause(View view) {
        this.player.pause();
    }

    public void onClickButtonPlay(View view) {
        this.player.play();
    }
}
2.「YOUR_OWN_KEY」を【準備】で取得しておいた、APIキーに変更。
3.「Ctrl+Shift+F」を押し、コードをフォーマッティング。
4.「Ctrl+S」を押し、ファイルを保存。


【手順5】
1.「Androidプロジェクトの作成・実行方法(バージョン別一覧)」のAndroidプロジェクトの実行手順で、実行。


【手順6】
1.以下の様に表示されれば成功です。


以上です。

YouTubeAPIPlaybackEvent

【目的】
AndroidでYouTubeAPIを使用してYouTubeの動画の再生イベント(PlaybackEvent)を取得します。


【準備】
1.「Google APIsのYouTube Data API v3のAPIキーを取得する方法」の手順で、「YouTube Data API v3」のAPIキーを取得しておきます。
※APIキーの取得に指定するパッケージ名は「com.example.androidsample44_007」です。


【手順1】
1.「Androidプロジェクトの作成・実行方法(バージョン別一覧)」のAndroidプロジェクトの作成手順で、「AndroidSample44-007-YouTubeAPIPlaybackEvent」といプロジェクトを作成。
※プロジェクトの設定は以下の通り。
※他の項目は任意。
項目名 項目に設定する値
アプリケーション名(Application Name) com.example.androidsample44_007
プロジェクト名(Project Name) AndroidSample44-007-YouTubeAPIPlaybackEvent
パッケージ名(Package Name) com.example.androidsample44_007
Build SDK API 8
Minimum Required SDK API 8

2.「YouTube Android Player API 1.0.0をライブラリに設定する方法」の手順でライブラリを設定。


【手順2】
1.「AndroidManifest.xml」は以下の通り。
<manifest xmlns:android="http://schemas.android.com/apk/res/android"
    package="com.example.androidsample44_007"
    android:versionCode="1"
    android:versionName="1.0" >

    <uses-sdk
        android:minSdkVersion="8"
        android:targetSdkVersion="8" />

    <uses-permission android:name="android.permission.INTERNET" />

    <application
        android:icon="@drawable/ic_launcher"
        android:label="@string/app_name"
        android:theme="@style/AppTheme" >
        <activity
            android:name="com.example.androidsample44_007.MainActivity"
            android:label="@string/title_activity_main" >
            <intent-filter>
                <action android:name="android.intent.action.MAIN" />

                <category android:name="android.intent.category.LAUNCHER" />
            </intent-filter>
        </activity>
    </application>

</manifest>
2.「Ctrl+Shift+F」を押し、コードをフォーマッティング。
3.「Ctrl+S」を押し、ファイルを保存。


【手順3】
1.「res/layout/activity_main.xml」は以下の通り。
<LinearLayout xmlns:android="http://schemas.android.com/apk/res/android"
    android:layout_width="match_parent"
    android:layout_height="match_parent"
    android:orientation="vertical" >

    <com.google.android.youtube.player.YouTubePlayerView
        android:id="@+id/youtube_view"
        android:layout_width="match_parent"
        android:layout_height="wrap_content" />

    <Button
        android:layout_width="wrap_content"
        android:layout_height="wrap_content"
        android:onClick="onClickButtonPlay"
        android:text="開始" />

    <Button
        android:layout_width="wrap_content"
        android:layout_height="wrap_content"
        android:onClick="onClickButtonPause"
        android:text="停止" />

    <TextView
        android:id="@+id/text"
        android:layout_width="match_parent"
        android:layout_height="match_parent" />

</LinearLayout>
2.「Ctrl+Shift+F」を押し、コードをフォーマッティング。
3.「Ctrl+S」を押し、ファイルを保存。


【手順4】
1.「src/com/example/androidsample44_007/MainActivity.java」は以下の通り。
package com.example.androidsample44_007;

import android.content.Intent;
import android.os.Bundle;
import android.view.View;
import android.widget.TextView;
import android.widget.Toast;

import com.google.android.youtube.player.YouTubeBaseActivity;
import com.google.android.youtube.player.YouTubeInitializationResult;
import com.google.android.youtube.player.YouTubePlayer;
import com.google.android.youtube.player.YouTubePlayer.PlaybackEventListener;
import com.google.android.youtube.player.YouTubePlayerView;

public class MainActivity extends YouTubeBaseActivity implements YouTubePlayer.OnInitializedListener {
    private static final String DEVELOPER_KEY = "YOUR_OWN_KEY";
    private static final String VIDEO_ID = "wKJ9KzGQq0w";
    private static final String INIT_ERROR_MESSAGE = "初期化に失敗しました。 (%1$s)";
    private static final int RECOVERY_DIALOG_REQUEST = 1;
    private YouTubePlayer player;

    @Override
    public void onCreate(Bundle savedInstanceState) {
        super.onCreate(savedInstanceState);
        setContentView(R.layout.activity_main);
        initYouTubeView();
    }

    @Override
    protected void onActivityResult(int requestCode, int resultCode, Intent data) {
        if (requestCode == RECOVERY_DIALOG_REQUEST) {
            initYouTubeView();
        }
    }

    public void onInitializationFailure(YouTubePlayer.Provider provider, YouTubeInitializationResult errorReason) {
        if (errorReason.isUserRecoverableError()) {
            errorReason.getErrorDialog(this, RECOVERY_DIALOG_REQUEST).show();
        } else {
            String errorMessage = String.format(INIT_ERROR_MESSAGE, errorReason.toString());
            Toast.makeText(this, errorMessage, Toast.LENGTH_LONG).show();
        }
    }

    public void onInitializationSuccess(YouTubePlayer.Provider provider, YouTubePlayer player, boolean wasRestored) {
        this.player = player;
        this.player.setPlaybackEventListener(new PlaybackEventListener() {
            public void onStopped() {
                setText("onStopped");
            }

            public void onSeekTo(int i) {
                setText("onSeekTo " + i);
            }

            public void onPlaying() {
                setText("onPlaying");
            }

            public void onPaused() {
                setText("onPaused");
            }

            public void onBuffering(boolean flag) {
                setText("onBuffering " + flag);
            }

            private void setText(String event) {
                TextView text = (TextView) findViewById(R.id.text);
                text.setText(event + "\n" + text.getText());
            }
        });
        if (!wasRestored) {
            player.cueVideo(VIDEO_ID);
        }
    }

    private void initYouTubeView() {
        YouTubePlayerView youTubeView = (YouTubePlayerView) findViewById(R.id.youtube_view);
        youTubeView.initialize(DEVELOPER_KEY, this);
    }

    public void onClickButtonPause(View view) {
        this.player.pause();
    }

    public void onClickButtonPlay(View view) {
        this.player.play();
    }
}
2.「YOUR_OWN_KEY」を【準備】で取得しておいた、APIキーに変更。
3.「Ctrl+Shift+F」を押し、コードをフォーマッティング。
4.「Ctrl+S」を押し、ファイルを保存。


【手順5】
1.「Androidプロジェクトの作成・実行方法(バージョン別一覧)」のAndroidプロジェクトの実行手順で、実行。


【手順6】
1.以下の様に表示されれば成功です。


以上です。

YouTubeAPIPlaylist

【目的】
AndroidでYouTubeAPIを使用してYouTubeの動画のプレイリストを再生します。


【準備】
1.「Google APIsのYouTube Data API v3のAPIキーを取得する方法」の手順で、「YouTube Data API v3」のAPIキーを取得しておきます。
※APIキーの取得に指定するパッケージ名は「com.example.androidsample44_006」です。


【手順1】
1.「Androidプロジェクトの作成・実行方法(バージョン別一覧)」のAndroidプロジェクトの作成手順で、「AndroidSample44-006-YouTubeAPIPlaylist」といプロジェクトを作成。
※プロジェクトの設定は以下の通り。
※他の項目は任意。
項目名 項目に設定する値
アプリケーション名(Application Name) com.example.androidsample44_006
プロジェクト名(Project Name) AndroidSample44-006-YouTubeAPIPlaylist
パッケージ名(Package Name) com.example.androidsample44_006
Build SDK API 8
Minimum Required SDK API 8

2.「YouTube Android Player API 1.0.0をライブラリに設定する方法」の手順でライブラリを設定。


【手順2】
1.「AndroidManifest.xml」は以下の通り。
<manifest xmlns:android="http://schemas.android.com/apk/res/android"
    package="com.example.androidsample44_006"
    android:versionCode="1"
    android:versionName="1.0" >

    <uses-sdk
        android:minSdkVersion="8"
        android:targetSdkVersion="8" />

    <uses-permission android:name="android.permission.INTERNET" />

    <application
        android:icon="@drawable/ic_launcher"
        android:label="@string/app_name"
        android:theme="@style/AppTheme" >
        <activity
            android:name="com.example.androidsample44_006.MainActivity"
            android:label="@string/title_activity_main" >
            <intent-filter>
                <action android:name="android.intent.action.MAIN" />

                <category android:name="android.intent.category.LAUNCHER" />
            </intent-filter>
        </activity>
    </application>

</manifest>
2.「Ctrl+Shift+F」を押し、コードをフォーマッティング。
3.「Ctrl+S」を押し、ファイルを保存。


【手順3】
1.「res/layout/activity_main.xml」は以下の通り。
<LinearLayout xmlns:android="http://schemas.android.com/apk/res/android"
    android:layout_width="match_parent"
    android:layout_height="match_parent"
    android:orientation="vertical" >

    <com.google.android.youtube.player.YouTubePlayerView
        android:id="@+id/youtube_view"
        android:layout_width="match_parent"
        android:layout_height="wrap_content" />

</LinearLayout>
2.「Ctrl+Shift+F」を押し、コードをフォーマッティング。
3.「Ctrl+S」を押し、ファイルを保存。


【手順4】
1.「src/com/example/androidsample44_006/MainActivity.java」は以下の通り。
package com.example.androidsample44_006;

import android.content.Intent;
import android.os.Bundle;
import android.widget.Toast;

import com.google.android.youtube.player.YouTubeBaseActivity;
import com.google.android.youtube.player.YouTubeInitializationResult;
import com.google.android.youtube.player.YouTubePlayer;
import com.google.android.youtube.player.YouTubePlayerView;

public class MainActivity extends YouTubeBaseActivity implements YouTubePlayer.OnInitializedListener {
    private static final String DEVELOPER_KEY = "YOUR_OWN_KEY";
    private static final String PLAYLIST_ID = "PLPTphZRRM3oUo7JUdbyE-q0V9orGvU7Ug";
    private static final String INIT_ERROR_MESSAGE = "初期化に失敗しました。 (%1$s)";
    private static final int RECOVERY_DIALOG_REQUEST = 1;

    @Override
    public void onCreate(Bundle savedInstanceState) {
        super.onCreate(savedInstanceState);
        setContentView(R.layout.activity_main);
        initYouTubeView();
    }

    @Override
    protected void onActivityResult(int requestCode, int resultCode, Intent data) {
        if (requestCode == RECOVERY_DIALOG_REQUEST) {
            initYouTubeView();
        }
    }

    public void onInitializationFailure(YouTubePlayer.Provider provider, YouTubeInitializationResult errorReason) {
        if (errorReason.isUserRecoverableError()) {
            errorReason.getErrorDialog(this, RECOVERY_DIALOG_REQUEST).show();
        } else {
            String errorMessage = String.format(INIT_ERROR_MESSAGE, errorReason.toString());
            Toast.makeText(this, errorMessage, Toast.LENGTH_LONG).show();
        }
    }

    public void onInitializationSuccess(YouTubePlayer.Provider provider, YouTubePlayer player, boolean wasRestored) {
        if (!wasRestored) {
            player.cuePlaylist(PLAYLIST_ID);
        }
    }

    private void initYouTubeView() {
        YouTubePlayerView youTubeView = (YouTubePlayerView) findViewById(R.id.youtube_view);
        youTubeView.initialize(DEVELOPER_KEY, this);
    }
}
2.「YOUR_OWN_KEY」を【準備】で取得しておいた、APIキーに変更。
3.「Ctrl+Shift+F」を押し、コードをフォーマッティング。
4.「Ctrl+S」を押し、ファイルを保存。


【手順5】
1.「Androidプロジェクトの作成・実行方法(バージョン別一覧)」のAndroidプロジェクトの実行手順で、実行。


【手順6】
1.以下の様に表示されれば成功です。


以上です。

YouTubeAPIPlayerStyle

【目的】
AndroidでYouTubeAPIを使用してYouTubeの動画のプレイヤーのスタイルを変更します。


【準備】
1.「Google APIsのYouTube Data API v3のAPIキーを取得する方法」の手順で、「YouTube Data API v3」のAPIキーを取得しておきます。
※APIキーの取得に指定するパッケージ名は「com.example.androidsample44_005」です。


【手順1】
1.「Androidプロジェクトの作成・実行方法(バージョン別一覧)」のAndroidプロジェクトの作成手順で、「AndroidSample44-005-YouTubeAPIPlayerStyle」といプロジェクトを作成。
※プロジェクトの設定は以下の通り。
※他の項目は任意。
項目名 項目に設定する値
アプリケーション名(Application Name) com.example.androidsample44_005
プロジェクト名(Project Name) AndroidSample44-005-YouTubeAPIPlayerStyle
パッケージ名(Package Name) com.example.androidsample44_005
Build SDK API 8
Minimum Required SDK API 8

2.「YouTube Android Player API 1.0.0をライブラリに設定する方法」の手順でライブラリを設定。


【手順2】
1.「AndroidManifest.xml」は以下の通り。
<manifest xmlns:android="http://schemas.android.com/apk/res/android"
    package="com.example.androidsample44_005"
    android:versionCode="1"
    android:versionName="1.0" >

    <uses-sdk
        android:minSdkVersion="8"
        android:targetSdkVersion="8" />

    <uses-permission android:name="android.permission.INTERNET" />

    <application
        android:icon="@drawable/ic_launcher"
        android:label="@string/app_name"
        android:theme="@style/AppTheme" >
        <activity
            android:name="com.example.androidsample44_005.MainActivity"
            android:label="@string/title_activity_main" >
            <intent-filter>
                <action android:name="android.intent.action.MAIN" />

                <category android:name="android.intent.category.LAUNCHER" />
            </intent-filter>
        </activity>
    </application>

</manifest>
2.「Ctrl+Shift+F」を押し、コードをフォーマッティング。
3.「Ctrl+S」を押し、ファイルを保存。


【手順3】
1.「res/layout/activity_main.xml」は以下の通り。
<LinearLayout xmlns:android="http://schemas.android.com/apk/res/android"
    android:layout_width="match_parent"
    android:layout_height="match_parent"
    android:orientation="vertical" >

    <com.google.android.youtube.player.YouTubePlayerView
        android:id="@+id/youtube_view"
        android:layout_width="match_parent"
        android:layout_height="wrap_content" />

    <RadioGroup
        android:layout_width="wrap_content"
        android:layout_height="wrap_content"
        android:orientation="vertical" >

        <RadioButton
            android:layout_width="wrap_content"
            android:layout_height="wrap_content"
            android:onClick="onClickRadioStyleDefault"
            android:text="Default" />

        <RadioButton
            android:layout_width="wrap_content"
            android:layout_height="wrap_content"
            android:onClick="onClickRadioStyleMinimal"
            android:text="Minimal" />

        <RadioButton
            android:layout_width="wrap_content"
            android:layout_height="wrap_content"
            android:onClick="onClickRadioStyleChromeless"
            android:text="Chromeless" />
    </RadioGroup>

</LinearLayout>
2.「Ctrl+Shift+F」を押し、コードをフォーマッティング。
3.「Ctrl+S」を押し、ファイルを保存。


【手順4】
1.「src/com/example/androidsample44_005/MainActivity.java」は以下の通り。
package com.example.androidsample44_005;

import android.content.Intent;
import android.os.Bundle;
import android.view.View;
import android.widget.RadioButton;
import android.widget.Toast;

import com.google.android.youtube.player.YouTubeBaseActivity;
import com.google.android.youtube.player.YouTubeInitializationResult;
import com.google.android.youtube.player.YouTubePlayer;
import com.google.android.youtube.player.YouTubePlayer.PlayerStyle;
import com.google.android.youtube.player.YouTubePlayerView;

public class MainActivity extends YouTubeBaseActivity implements YouTubePlayer.OnInitializedListener {
    private static final String DEVELOPER_KEY = "YOUR_OWN_KEY";
    private static final String VIDEO_ID = "wKJ9KzGQq0w";
    private static final String INIT_ERROR_MESSAGE = "初期化に失敗しました。 (%1$s)";
    private static final int RECOVERY_DIALOG_REQUEST = 1;
    private YouTubePlayer player;

    @Override
    public void onCreate(Bundle savedInstanceState) {
        super.onCreate(savedInstanceState);
        setContentView(R.layout.activity_main);
        initYouTubeView();
    }

    @Override
    protected void onActivityResult(int requestCode, int resultCode, Intent data) {
        if (requestCode == RECOVERY_DIALOG_REQUEST) {
            initYouTubeView();
        }
    }

    public void onInitializationFailure(YouTubePlayer.Provider provider, YouTubeInitializationResult errorReason) {
        if (errorReason.isUserRecoverableError()) {
            errorReason.getErrorDialog(this, RECOVERY_DIALOG_REQUEST).show();
        } else {
            String errorMessage = String.format(INIT_ERROR_MESSAGE, errorReason.toString());
            Toast.makeText(this, errorMessage, Toast.LENGTH_LONG).show();
        }
    }

    public void onInitializationSuccess(YouTubePlayer.Provider provider, YouTubePlayer player, boolean wasRestored) {
        this.player = player;
        if (!wasRestored) {
            player.cueVideo(VIDEO_ID);
        }
    }

    private void initYouTubeView() {
        YouTubePlayerView youTubeView = (YouTubePlayerView) findViewById(R.id.youtube_view);
        youTubeView.initialize(DEVELOPER_KEY, this);
    }

    public void onClickRadioStyleDefault(View view) {
        RadioButton radioButton = (RadioButton) view;

        if (radioButton.isChecked()) {
            this.player.setPlayerStyle(PlayerStyle.DEFAULT);
        }
    }

    public void onClickRadioStyleMinimal(View view) {
        RadioButton radioButton = (RadioButton) view;

        if (radioButton.isChecked()) {
            this.player.setPlayerStyle(PlayerStyle.MINIMAL);
        }
    }

    public void onClickRadioStyleChromeless(View view) {
        RadioButton radioButton = (RadioButton) view;

        if (radioButton.isChecked()) {
            this.player.setPlayerStyle(PlayerStyle.CHROMELESS);
        }
    }
}
2.「YOUR_OWN_KEY」を【準備】で取得しておいた、APIキーに変更。
3.「Ctrl+Shift+F」を押し、コードをフォーマッティング。
4.「Ctrl+S」を押し、ファイルを保存。


【手順5】
1.「Androidプロジェクトの作成・実行方法(バージョン別一覧)」のAndroidプロジェクトの実行手順で、実行。


【手順6】
1.以下の様に表示されれば成功です。


以上です。

YouTubeAPISeekTo

【目的】
AndroidでYouTubeAPIを使用してYouTubeの動画を指定時間にシーク(移動)します。


【準備】
1.「Google APIsのYouTube Data API v3のAPIキーを取得する方法」の手順で、「YouTube Data API v3」のAPIキーを取得しておきます。
※APIキーの取得に指定するパッケージ名は「com.example.androidsample44_004」です。


【手順1】
1.「Androidプロジェクトの作成・実行方法(バージョン別一覧)」のAndroidプロジェクトの作成手順で、「AndroidSample44-004-YouTubeAPISeekTo」といプロジェクトを作成。
※プロジェクトの設定は以下の通り。
※他の項目は任意。
項目名 項目に設定する値
アプリケーション名(Application Name) com.example.androidsample44_004
プロジェクト名(Project Name) AndroidSample44-004-YouTubeAPISeekTo
パッケージ名(Package Name) com.example.androidsample44_004
Build SDK API 8
Minimum Required SDK API 8

2.「YouTube Android Player API 1.0.0をライブラリに設定する方法」の手順でライブラリを設定。


【手順2】
1.「AndroidManifest.xml」は以下の通り。
<manifest xmlns:android="http://schemas.android.com/apk/res/android"
    package="com.example.androidsample44_004"
    android:versionCode="1"
    android:versionName="1.0" >

    <uses-sdk
        android:minSdkVersion="8"
        android:targetSdkVersion="8" />

    <uses-permission android:name="android.permission.INTERNET" />

    <application
        android:icon="@drawable/ic_launcher"
        android:label="@string/app_name"
        android:theme="@style/AppTheme" >
        <activity
            android:name="com.example.androidsample44_004.MainActivity"
            android:label="@string/title_activity_main" >
            <intent-filter>
                <action android:name="android.intent.action.MAIN" />

                <category android:name="android.intent.category.LAUNCHER" />
            </intent-filter>
        </activity>
    </application>

</manifest>
2.「Ctrl+Shift+F」を押し、コードをフォーマッティング。
3.「Ctrl+S」を押し、ファイルを保存。


【手順3】
1.「res/layout/activity_main.xml」は以下の通り。
<LinearLayout xmlns:android="http://schemas.android.com/apk/res/android"
    android:layout_width="match_parent"
    android:layout_height="match_parent"
    android:orientation="vertical" >

    <com.google.android.youtube.player.YouTubePlayerView
        android:id="@+id/youtube_view"
        android:layout_width="match_parent"
        android:layout_height="wrap_content" />

    <EditText
        android:id="@+id/skipToText"
        android:layout_width="60sp"
        android:layout_height="wrap_content"
        android:layout_margin="5dp"
        android:inputType="number" />

    <Button
        android:layout_width="wrap_content"
        android:layout_height="wrap_content"
        android:onClick="onClickButtonSeekTo"
        android:text="秒へ進む" />

</LinearLayout>
2.「Ctrl+Shift+F」を押し、コードをフォーマッティング。
3.「Ctrl+S」を押し、ファイルを保存。


【手順4】
1.「src/com/example/androidsample44_004/MainActivity.java」は以下の通り。
package com.example.androidsample44_004;

import android.content.Intent;
import android.os.Bundle;
import android.view.View;
import android.widget.EditText;
import android.widget.Toast;

import com.google.android.youtube.player.YouTubeBaseActivity;
import com.google.android.youtube.player.YouTubeInitializationResult;
import com.google.android.youtube.player.YouTubePlayer;
import com.google.android.youtube.player.YouTubePlayerView;

public class MainActivity extends YouTubeBaseActivity implements YouTubePlayer.OnInitializedListener {
    private static final String DEVELOPER_KEY = "YOUR_OWN_KEY";
    private static final String VIDEO_ID = "wKJ9KzGQq0w";
    private static final String INIT_ERROR_MESSAGE = "初期化に失敗しました。 (%1$s)";
    private static final int RECOVERY_DIALOG_REQUEST = 1;
    private YouTubePlayer player;

    @Override
    public void onCreate(Bundle savedInstanceState) {
        super.onCreate(savedInstanceState);
        setContentView(R.layout.activity_main);
        initYouTubeView();
    }

    @Override
    protected void onActivityResult(int requestCode, int resultCode, Intent data) {
        if (requestCode == RECOVERY_DIALOG_REQUEST) {
            initYouTubeView();
        }
    }

    public void onInitializationFailure(YouTubePlayer.Provider provider, YouTubeInitializationResult errorReason) {
        if (errorReason.isUserRecoverableError()) {
            errorReason.getErrorDialog(this, RECOVERY_DIALOG_REQUEST).show();
        } else {
            String errorMessage = String.format(INIT_ERROR_MESSAGE, errorReason.toString());
            Toast.makeText(this, errorMessage, Toast.LENGTH_LONG).show();
        }
    }

    public void onInitializationSuccess(YouTubePlayer.Provider provider, YouTubePlayer player, boolean wasRestored) {
        this.player = player;
        if (!wasRestored) {
            player.cueVideo(VIDEO_ID);
        }
    }

    private void initYouTubeView() {
        YouTubePlayerView youTubeView = (YouTubePlayerView) findViewById(R.id.youtube_view);
        youTubeView.initialize(DEVELOPER_KEY, this);
    }

    public void onClickButtonSeekTo(View view) {
        EditText skipToText = (EditText) findViewById(R.id.skipToText);
        this.player.seekToMillis(Integer.parseInt(skipToText.getText().toString()) * 1000);
    }
}
2.「YOUR_OWN_KEY」を【準備】で取得しておいた、APIキーに変更。
3.「Ctrl+Shift+F」を押し、コードをフォーマッティング。
4.「Ctrl+S」を押し、ファイルを保存。


【手順5】
1.「Androidプロジェクトの作成・実行方法(バージョン別一覧)」のAndroidプロジェクトの実行手順で、実行。


【手順6】
1.以下の様に表示されれば成功です。


以上です。

YouTubeAPISeekRelative

【目的】
AndroidでYouTubeAPIを使用してYouTubeの動画を現在再生時間から相対的にシーク(移動)します。


【準備】
1.「Google APIsのYouTube Data API v3のAPIキーを取得する方法」の手順で、「YouTube Data API v3」のAPIキーを取得しておきます。
※APIキーの取得に指定するパッケージ名は「com.example.androidsample44_003」です。


【手順1】
1.「Androidプロジェクトの作成・実行方法(バージョン別一覧)」のAndroidプロジェクトの作成手順で、「AndroidSample44-003-YouTubeAPISeekRelative」といプロジェクトを作成。
※プロジェクトの設定は以下の通り。
※他の項目は任意。
項目名 項目に設定する値
アプリケーション名(Application Name) com.example.androidsample44_003
プロジェクト名(Project Name) AndroidSample44-003-YouTubeAPISeekRelative
パッケージ名(Package Name) com.example.androidsample44_003
Build SDK API 8
Minimum Required SDK API 8

2.「YouTube Android Player API 1.0.0をライブラリに設定する方法」の手順でライブラリを設定。


【手順2】
1.「AndroidManifest.xml」は以下の通り。
<manifest xmlns:android="http://schemas.android.com/apk/res/android"
    package="com.example.androidsample44_003"
    android:versionCode="1"
    android:versionName="1.0" >

    <uses-sdk
        android:minSdkVersion="8"
        android:targetSdkVersion="8" />

    <uses-permission android:name="android.permission.INTERNET" />

    <application
        android:icon="@drawable/ic_launcher"
        android:label="@string/app_name"
        android:theme="@style/AppTheme" >
        <activity
            android:name="com.example.androidsample44_003.MainActivity"
            android:label="@string/title_activity_main" >
            <intent-filter>
                <action android:name="android.intent.action.MAIN" />

                <category android:name="android.intent.category.LAUNCHER" />
            </intent-filter>
        </activity>
    </application>

</manifest>
2.「Ctrl+Shift+F」を押し、コードをフォーマッティング。
3.「Ctrl+S」を押し、ファイルを保存。


【手順3】
1.「res/layout/activity_main.xml」は以下の通り。
<LinearLayout xmlns:android="http://schemas.android.com/apk/res/android"
    android:layout_width="match_parent"
    android:layout_height="match_parent"
    android:orientation="vertical" >

    <com.google.android.youtube.player.YouTubePlayerView
        android:id="@+id/youtube_view"
        android:layout_width="match_parent"
        android:layout_height="wrap_content" />

    <Button
        android:layout_width="wrap_content"
        android:layout_height="wrap_content"
        android:onClick="onClickButtonMinus1Second"
        android:text="1秒戻る" />

    <Button
        android:layout_width="wrap_content"
        android:layout_height="wrap_content"
        android:onClick="onClickButtonPlus1Second"
        android:text="1秒進む" />

</LinearLayout>
2.「Ctrl+Shift+F」を押し、コードをフォーマッティング。
3.「Ctrl+S」を押し、ファイルを保存。


【手順4】
1.「src/com/example/androidsample44_003/MainActivity.java」は以下の通り。
package com.example.androidsample44_003;

import android.content.Intent;
import android.os.Bundle;
import android.view.View;
import android.widget.Toast;

import com.google.android.youtube.player.YouTubeBaseActivity;
import com.google.android.youtube.player.YouTubeInitializationResult;
import com.google.android.youtube.player.YouTubePlayer;
import com.google.android.youtube.player.YouTubePlayerView;

public class MainActivity extends YouTubeBaseActivity implements YouTubePlayer.OnInitializedListener {
    private static final String DEVELOPER_KEY = "YOUR_OWN_KEY";
    private static final String VIDEO_ID = "wKJ9KzGQq0w";
    private static final String INIT_ERROR_MESSAGE = "初期化に失敗しました。 (%1$s)";
    private static final int RECOVERY_DIALOG_REQUEST = 1;
    private YouTubePlayer player;

    @Override
    public void onCreate(Bundle savedInstanceState) {
        super.onCreate(savedInstanceState);
        setContentView(R.layout.activity_main);
        initYouTubeView();
    }

    @Override
    protected void onActivityResult(int requestCode, int resultCode, Intent data) {
        if (requestCode == RECOVERY_DIALOG_REQUEST) {
            initYouTubeView();
        }
    }

    public void onInitializationFailure(YouTubePlayer.Provider provider, YouTubeInitializationResult errorReason) {
        if (errorReason.isUserRecoverableError()) {
            errorReason.getErrorDialog(this, RECOVERY_DIALOG_REQUEST).show();
        } else {
            String errorMessage = String.format(INIT_ERROR_MESSAGE, errorReason.toString());
            Toast.makeText(this, errorMessage, Toast.LENGTH_LONG).show();
        }
    }

    public void onInitializationSuccess(YouTubePlayer.Provider provider, YouTubePlayer player, boolean wasRestored) {
        this.player = player;
        if (!wasRestored) {
            player.cueVideo(VIDEO_ID);
        }
    }

    private void initYouTubeView() {
        YouTubePlayerView youTubeView = (YouTubePlayerView) findViewById(R.id.youtube_view);
        youTubeView.initialize(DEVELOPER_KEY, this);
    }

    public void onClickButtonMinus1Second(View view) {
        this.player.seekRelativeMillis(-1000);
    }

    public void onClickButtonPlus1Second(View view) {
        this.player.seekRelativeMillis(1000);
    }
}
2.「YOUR_OWN_KEY」を【準備】で取得しておいた、APIキーに変更。
3.「Ctrl+Shift+F」を押し、コードをフォーマッティング。
4.「Ctrl+S」を押し、ファイルを保存。


【手順5】
1.「Androidプロジェクトの作成・実行方法(バージョン別一覧)」のAndroidプロジェクトの実行手順で、実行。


【手順6】
1.以下の様に表示されれば成功です。


以上です。

YouTubeAPIPlayPause

【目的】
AndroidでYouTubeAPIを使用してYouTubeの動画を再生・停止します。


【準備】
1.「Google APIsのYouTube Data API v3のAPIキーを取得する方法」の手順で、「YouTube Data API v3」のAPIキーを取得しておきます。
※APIキーの取得に指定するパッケージ名は「com.example.androidsample44_002」です。


【手順1】
1.「Androidプロジェクトの作成・実行方法(バージョン別一覧)」のAndroidプロジェクトの作成手順で、「AndroidSample44-002-YouTubeAPIPlayPause」といプロジェクトを作成。
※プロジェクトの設定は以下の通り。
※他の項目は任意。
項目名 項目に設定する値
アプリケーション名(Application Name) com.example.androidsample44_002
プロジェクト名(Project Name) AndroidSample44-002-YouTubeAPIPlayPause
パッケージ名(Package Name) com.example.androidsample44_002
Build SDK API 8
Minimum Required SDK API 8

2.「YouTube Android Player API 1.0.0をライブラリに設定する方法」の手順でライブラリを設定。


【手順2】
1.「AndroidManifest.xml」は以下の通り。
<manifest xmlns:android="http://schemas.android.com/apk/res/android"
    package="com.example.androidsample44_002"
    android:versionCode="1"
    android:versionName="1.0" >

    <uses-sdk
        android:minSdkVersion="8"
        android:targetSdkVersion="8" />

    <uses-permission android:name="android.permission.INTERNET" />

    <application
        android:icon="@drawable/ic_launcher"
        android:label="@string/app_name"
        android:theme="@style/AppTheme" >
        <activity
            android:name="com.example.androidsample44_002.MainActivity"
            android:label="@string/title_activity_main" >
            <intent-filter>
                <action android:name="android.intent.action.MAIN" />

                <category android:name="android.intent.category.LAUNCHER" />
            </intent-filter>
        </activity>
    </application>

</manifest>
2.「Ctrl+Shift+F」を押し、コードをフォーマッティング。
3.「Ctrl+S」を押し、ファイルを保存。


【手順3】
1.「res/layout/activity_main.xml」は以下の通り。
<LinearLayout xmlns:android="http://schemas.android.com/apk/res/android"
    android:layout_width="match_parent"
    android:layout_height="match_parent"
    android:orientation="vertical" >

    <com.google.android.youtube.player.YouTubePlayerView
        android:id="@+id/youtube_view"
        android:layout_width="match_parent"
        android:layout_height="wrap_content" />

    <Button
        android:layout_width="wrap_content"
        android:layout_height="wrap_content"
        android:onClick="onClickButtonPlay"
        android:text="開始" />

    <Button
        android:layout_width="wrap_content"
        android:layout_height="wrap_content"
        android:onClick="onClickButtonPause"
        android:text="停止" />

</LinearLayout>
2.「Ctrl+Shift+F」を押し、コードをフォーマッティング。
3.「Ctrl+S」を押し、ファイルを保存。


【手順4】
1.「src/com/example/androidsample44_002/MainActivity.java」は以下の通り。
package com.example.androidsample44_002;

import android.content.Intent;
import android.os.Bundle;
import android.view.View;
import android.widget.Toast;

import com.google.android.youtube.player.YouTubeBaseActivity;
import com.google.android.youtube.player.YouTubeInitializationResult;
import com.google.android.youtube.player.YouTubePlayer;
import com.google.android.youtube.player.YouTubePlayerView;

public class MainActivity extends YouTubeBaseActivity implements YouTubePlayer.OnInitializedListener {
    private static final String DEVELOPER_KEY = "YOUR_OWN_KEY";
    private static final String VIDEO_ID = "wKJ9KzGQq0w";
    private static final String INIT_ERROR_MESSAGE = "初期化に失敗しました。 (%1$s)";
    private static final int RECOVERY_DIALOG_REQUEST = 1;
    private YouTubePlayer player;

    @Override
    public void onCreate(Bundle savedInstanceState) {
        super.onCreate(savedInstanceState);
        setContentView(R.layout.activity_main);
        initYouTubeView();
    }

    @Override
    protected void onActivityResult(int requestCode, int resultCode, Intent data) {
        if (requestCode == RECOVERY_DIALOG_REQUEST) {
            initYouTubeView();
        }
    }

    public void onInitializationFailure(YouTubePlayer.Provider provider, YouTubeInitializationResult errorReason) {
        if (errorReason.isUserRecoverableError()) {
            errorReason.getErrorDialog(this, RECOVERY_DIALOG_REQUEST).show();
        } else {
            String errorMessage = String.format(INIT_ERROR_MESSAGE, errorReason.toString());
            Toast.makeText(this, errorMessage, Toast.LENGTH_LONG).show();
        }
    }

    public void onInitializationSuccess(YouTubePlayer.Provider provider, YouTubePlayer player, boolean wasRestored) {
        this.player = player;
        if (!wasRestored) {
            player.cueVideo(VIDEO_ID);
        }
    }

    private void initYouTubeView() {
        YouTubePlayerView youTubeView = (YouTubePlayerView) findViewById(R.id.youtube_view);
        youTubeView.initialize(DEVELOPER_KEY, this);
    }

    public void onClickButtonPause(View view) {
        this.player.pause();
    }

    public void onClickButtonPlay(View view) {
        this.player.play();
    }
}
2.「YOUR_OWN_KEY」を【準備】で取得しておいた、APIキーに変更。
3.「Ctrl+Shift+F」を押し、コードをフォーマッティング。
4.「Ctrl+S」を押し、ファイルを保存。


【手順5】
1.「Androidプロジェクトの作成・実行方法(バージョン別一覧)」のAndroidプロジェクトの実行手順で、実行。


【手順6】
1.以下の様に表示されれば成功です。


以上です。

2013年10月28日月曜日

ポップオーバー(contentを静的HTML)

【目的】
Twitter Bootstrap2.3.1でポップオーバーのcontentに静的HTMLの一部を指定します。


【準備】
1.「Twitter Bootstrap2.3.1の使用方法」の手順の通り、Twitter Bootstrapを配置しておきます。


【手順1】
1.HTMLファイル「index.html」(任意)を作成。
2.「index.html」を以下の様に入力。
<!DOCTYPE html>
<html>
    <head>
        <link href="bootstrap/css/bootstrap.min.css" rel="stylesheet" />
    </head>
    <body>
        <a href="#" class="btn popover-test">ポップオーバーボタン</a>
        <div id="popover_content" style="display: none">
            <a href="http://yahoo.com/">Yahoo</a><br />
            <a href="http://google.com/">Google</a><br />
            <a href="http://www.nikkei.com/">日経</a>
        </div>

        <script src="http://code.jquery.com/jquery.js"></script>
        <script src="bootstrap/js/bootstrap.min.js"></script>
        <script>
            $('.popover-test').popover({
                    title: "タイトル",
                    placement: "bottom",
                    html: "true",
                    content: function() {
                        return $("#popover_content").html();
                    }
                }
            );
        </script>
        
    </body>
</html>


【手順2】
1.ブラウザで「index.html」を開き、以下の様に表示されれば成功です。


以上です。

ポップオーバー(JS指定2)

【目的】
Twitter Bootstrap2.3.1でポップオーバーの設定をJavaScript(JQuery)で指定します。
※その2では複数項目を指定します。


【準備】
1.「Twitter Bootstrap2.3.1の使用方法」の手順の通り、Twitter Bootstrapを配置しておきます。


【手順1】
1.HTMLファイル「index.html」(任意)を作成。
2.「index.html」を以下の様に入力。
<!DOCTYPE html>
<html>
    <head>
        <link href="bootstrap/css/bootstrap.min.css" rel="stylesheet" />
    </head>
    <body>
        <a href="#" class="btn popover-test">ポップオーバーボタン</a>

        <script src="http://code.jquery.com/jquery.js"></script>
        <script src="bootstrap/js/bootstrap.min.js"></script>
        <script>
            $('.popover-test').popover({
                    title: 'タイトル',
                    placement: 'bottom',
                    html: 'true',
                    content: '<a href="http://yahoo.com/">Yahoo</a><br /><a href="http://google.com/">Google</a>'
                }
            );
        </script>
    </body>
</html>


【手順2】
1.ブラウザで「index.html」を開き、以下の様に表示されれば成功です。


以上です。

ポップオーバー(JS指定1)

【目的】
Twitter Bootstrap2.3.1でポップオーバーの設定をJavaScript(JQuery)で指定します。


【準備】
1.「Twitter Bootstrap2.3.1の使用方法」の手順の通り、Twitter Bootstrapを配置しておきます。


【手順1】
1.HTMLファイル「index.html」(任意)を作成。
2.「index.html」を以下の様に入力。
<!DOCTYPE html>
<html>
    <head>
        <link href="bootstrap/css/bootstrap.min.css" rel="stylesheet" />
    </head>
    <body>
        <br />
        <br />
        <br />
        <a href="#" class="btn popover-test">ポップオーバーボタン</a>

        <script src="http://code.jquery.com/jquery.js"></script>
        <script src="bootstrap/js/bootstrap.min.js"></script>
        <script>
            $('.popover-test').popover({title: 'タイトル'});
        </script>
    </body>
</html>


【手順2】
1.ブラウザで「index.html」を開き、以下の様に表示されれば成功です。


以上です。

ポップオーバー(HTML)

【目的】
Twitter Bootstrap2.3.1でポップオーバーの内容をHTMLで指定します。


【準備】
1.「Twitter Bootstrap2.3.1の使用方法」の手順の通り、Twitter Bootstrapを配置しておきます。


【手順1】
1.HTMLファイル「index.html」(任意)を作成。
2.「index.html」を以下の様に入力。
<!DOCTYPE html>
<html>
    <head>
        <link href="bootstrap/css/bootstrap.min.css" rel="stylesheet" />
    </head>
    <body>
        <a href="#" class="btn popover-test" title="タイトル" data-placement="bottom" data-html="true" data-content="<a href='http://yahoo.com/'>Yahoo</a><br /><a href='http://google.com/'>Google</a>">ポップオーバーボタン</a>

        <script src="http://code.jquery.com/jquery.js"></script>
        <script src="bootstrap/js/bootstrap.min.js"></script>
        <script>
            $('.popover-test').popover()
        </script>
    </body>
</html>


【手順2】
1.ブラウザで「index.html」を開き、以下の様に表示されれば成功です。


以上です。

YouTubeAPI

【目的】
AndroidでYouTubeAPIを使用してYouTubeを表示します。


【準備】
1.「Google APIsのYouTube Data API v3のAPIキーを取得する方法」の手順で、「YouTube Data API v3」のAPIキーを取得しておきます。
※APIキーの取得に指定するパッケージ名は「com.example.androidsample44_001」です。


【手順1】
1.「Androidプロジェクトの作成・実行方法(バージョン別一覧)」のAndroidプロジェクトの作成手順で、「AndroidSample44-001-YouTubeAPI」といプロジェクトを作成。
※プロジェクトの設定は以下の通り。
※他の項目は任意。
項目名 項目に設定する値
アプリケーション名(Application Name) com.example.androidsample44_001
プロジェクト名(Project Name) AndroidSample44-001-YouTubeAPI
パッケージ名(Package Name) com.example.androidsample44_001
Build SDK API 8
Minimum Required SDK API 8

2.「YouTube Android Player API 1.0.0をライブラリに設定する方法」の手順でライブラリを設定。


【手順2】
1.「AndroidManifest.xml」は以下の通り。
<manifest xmlns:android="http://schemas.android.com/apk/res/android"
    package="com.example.androidsample44_001"
    android:versionCode="1"
    android:versionName="1.0" >

    <uses-sdk
        android:minSdkVersion="8"
        android:targetSdkVersion="8" />

    <uses-permission android:name="android.permission.INTERNET" />

    <application
        android:icon="@drawable/ic_launcher"
        android:label="@string/app_name"
        android:theme="@style/AppTheme" >
        <activity
            android:name="com.example.androidsample44_001.MainActivity"
            android:label="@string/title_activity_main" >
            <intent-filter>
                <action android:name="android.intent.action.MAIN" />

                <category android:name="android.intent.category.LAUNCHER" />
            </intent-filter>
        </activity>
    </application>

</manifest>
2.「Ctrl+Shift+F」を押し、コードをフォーマッティング。
3.「Ctrl+S」を押し、ファイルを保存。


【手順3】
1.「res/layout/activity_main.xml」は以下の通り。
<LinearLayout xmlns:android="http://schemas.android.com/apk/res/android"
    android:layout_width="match_parent"
    android:layout_height="match_parent"
    android:orientation="vertical" >

    <com.google.android.youtube.player.YouTubePlayerView
        android:id="@+id/youtube_view"
        android:layout_width="match_parent"
        android:layout_height="wrap_content" />

</LinearLayout>
2.「Ctrl+Shift+F」を押し、コードをフォーマッティング。
3.「Ctrl+S」を押し、ファイルを保存。


【手順4】
1.「src/com/example/androidsample44_001/MainActivity.java」は以下の通り。
package com.example.androidsample44_001;

import android.content.Intent;
import android.os.Bundle;
import android.widget.Toast;

import com.google.android.youtube.player.YouTubeBaseActivity;
import com.google.android.youtube.player.YouTubeInitializationResult;
import com.google.android.youtube.player.YouTubePlayer;
import com.google.android.youtube.player.YouTubePlayerView;

public class MainActivity extends YouTubeBaseActivity implements YouTubePlayer.OnInitializedListener {
    private static final String DEVELOPER_KEY = "YOUR_OWN_KEY";
    private static final String VIDEO_ID = "wKJ9KzGQq0w";
    private static final String INIT_ERROR_MESSAGE = "初期化に失敗しました。 (%1$s)";
    private static final int RECOVERY_DIALOG_REQUEST = 1;

    @Override
    public void onCreate(Bundle savedInstanceState) {
        super.onCreate(savedInstanceState);
        setContentView(R.layout.activity_main);
        initYouTubeView();
    }

    @Override
    protected void onActivityResult(int requestCode, int resultCode, Intent data) {
        if (requestCode == RECOVERY_DIALOG_REQUEST) {
            initYouTubeView();
        }
    }

    public void onInitializationFailure(YouTubePlayer.Provider provider, YouTubeInitializationResult errorReason) {
        if (errorReason.isUserRecoverableError()) {
            errorReason.getErrorDialog(this, RECOVERY_DIALOG_REQUEST).show();
        } else {
            String errorMessage = String.format(INIT_ERROR_MESSAGE, errorReason.toString());
            Toast.makeText(this, errorMessage, Toast.LENGTH_LONG).show();
        }
    }

    public void onInitializationSuccess(YouTubePlayer.Provider provider, YouTubePlayer player, boolean wasRestored) {
        if (!wasRestored) {
            player.cueVideo(VIDEO_ID);
        }
    }

    private void initYouTubeView() {
        YouTubePlayerView youTubeView = (YouTubePlayerView) findViewById(R.id.youtube_view);
        youTubeView.initialize(DEVELOPER_KEY, this);
    }
}
2.「YOUR_OWN_KEY」を【準備】で取得しておいた、APIキーに変更。
3.「Ctrl+Shift+F」を押し、コードをフォーマッティング。
4.「Ctrl+S」を押し、ファイルを保存。


【手順5】
1.「Androidプロジェクトの作成・実行方法(バージョン別一覧)」のAndroidプロジェクトの実行手順で、実行。


【手順6】
1.以下の様に表示されれば成功です。


以上です。

YouTube Android Player API 1.0.0をライブラリに設定する方法

【目的】
YouTube Android Player API 1.0.0をライブラリに設定します。


【手順1】
1.「YouTube Android Player API 1.0.0のライブラリの解凍方法」の手順で解凍した、「YouTubeAndroidPlayerApi.jar」を選択し、右クリックから「コピー」を選択。


【手順2】
1.YouTube Android Player APIを使用したいプロジェクトの「libs」ディレクトリを選択し、「Ctrl+V」で貼り付け。


【手順3】
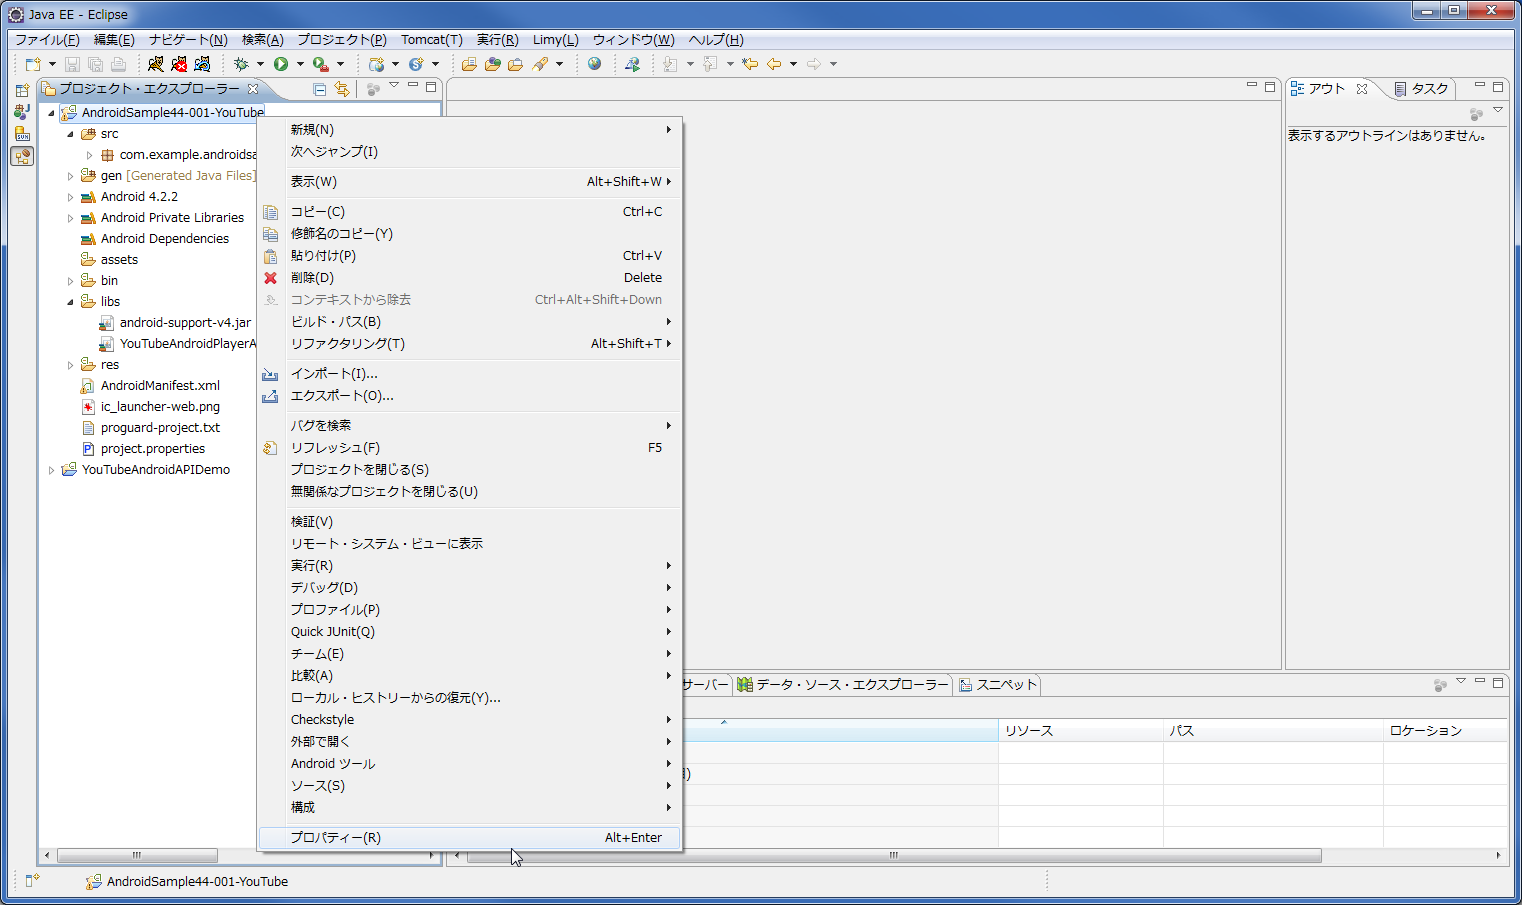
1.YouTube Android Player APIを使用したいプロジェクトを選択し、右クリックから「プロパティー」を選択。


【手順4】
1.左のメニューから「Javaのビルド・パス」を選択。


【手順5】
1.「ライブラリー」を選択。


【手順6】
1.「Jar追加」ボタンをクリック。


【手順7】
1.【手順2】で貼り付けたJarファイルを選択。
2.「OK」ボタンをクリック。


【手順8】
1.「OK」ボタンをクリック。


【手順9】
1.以下の様にAndroid Dependenciesに「YouTubeAndroidPlayerApi.jar」が表示されていれば成功です。


以上です。

関連記事