PhoneGap2.1.0をダウンロードし、インストールします。
【手順1】
1.「PhoneGapのサイト」にアクセス。
2.「Download PhoneGap」をクリック。

1.「Download」をクリック。

1.保存場所を選択。
2.「保存」ボタンをクリック。
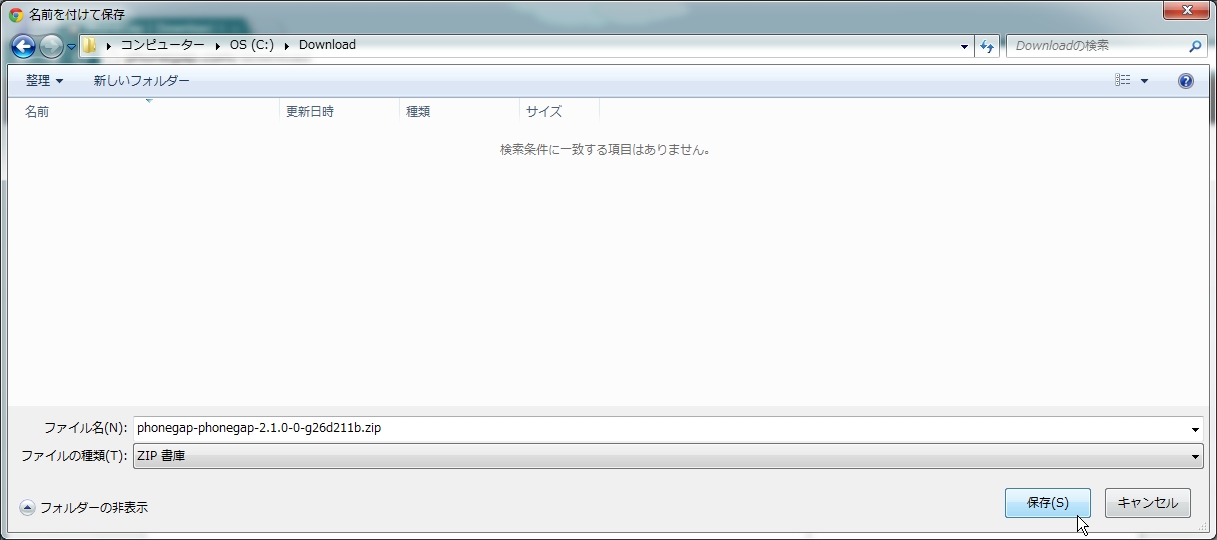
以上です。
<?xml version="1.0" encoding="UTF-8"?>
<web-app xmlns:xsi="http://www.w3.org/2001/XMLSchema-instance"
    xmlns="http://java.sun.com/xml/ns/javaee" xmlns:web="http://java.sun.com/xml/ns/javaee/web-app_2_5.xsd"
    xsi:schemaLocation="http://java.sun.com/xml/ns/javaee http://java.sun.com/xml/ns/javaee/web-app_2_5.xsd"
    id="WebApp_ID" version="2.5">

    <display-name>JSF12Sample037-PanelGroup2</display-name>

    <context-param>
        <param-name>javax.faces.DEFAULT_SUFFIX</param-name>
        <param-value>.xhtml</param-value>
    </context-param>

    <welcome-file-list>
        <welcome-file>faces/index.xhtml</welcome-file>
    </welcome-file-list>

    <servlet>
        <servlet-name>Faces Servlet</servlet-name>
        <servlet-class>javax.faces.webapp.FacesServlet</servlet-class>
        <load-on-startup>1</load-on-startup>
    </servlet>

    <servlet-mapping>
        <servlet-name>Faces Servlet</servlet-name>
        <url-pattern>/faces/*</url-pattern>
    </servlet-mapping>
</web-app>
<?xml version="1.0" encoding="UTF-8"?>

<faces-config xmlns="http://java.sun.com/xml/ns/javaee"
    xmlns:xsi="http://www.w3.org/2001/XMLSchema-instance"
    xsi:schemaLocation="http://java.sun.com/xml/ns/javaee http://java.sun.com/xml/ns/javaee/web-facesconfig_1_2.xsd"
    version="1.2">

    <application>
        <view-handler>com.sun.facelets.FaceletViewHandler</view-handler>
    </application>

</faces-config><html xmlns="http://www.w3c.org/1999/xhtml"
xmlns:f="http://java.sun.com/jsf/core"
xmlns:h="http://java.sun.com/jsf/html">
<head>
</head>
<body>
<h:panelGroup style="background-color:green;">
<h:outputText value="あああ" />
<h:outputText value="いいい" />
</h:panelGroup>
<h:panelGroup layout="block" style="background-color:yellow;">
<h:outputText value="ううう" />
<h:outputText value="えええ" />
</h:panelGroup>
</body>
</html>
http://localhost:8080/JSF12Sample037-PanelGroup2/faces/index.xhtml
<html xmlns="http://www.w3c.org/1999/xhtml">
<head>
</head>
<body>
    <span style="background-color:green;">
        あああいいい
    </span>
    <div style="background-color:yellow;">
        うううえええ
    </div>
</body>
</html>
<?xml version="1.0" encoding="UTF-8"?>
<web-app xmlns:xsi="http://www.w3.org/2001/XMLSchema-instance"
    xmlns="http://java.sun.com/xml/ns/javaee" xmlns:web="http://java.sun.com/xml/ns/javaee/web-app_2_5.xsd"
    xsi:schemaLocation="http://java.sun.com/xml/ns/javaee http://java.sun.com/xml/ns/javaee/web-app_2_5.xsd"
    id="WebApp_ID" version="2.5">

    <display-name>JSF12Sample036-ComponentParameter</display-name>

    <context-param>
        <param-name>javax.faces.DEFAULT_SUFFIX</param-name>
        <param-value>.xhtml</param-value>
    </context-param>

    <context-param>
        <param-name>facelets.LIBRARIES</param-name>
        <param-value>
            /WEB-INF/facelets/foolprogrammer-taglib.xml
       </param-value>
    </context-param>

    <welcome-file-list>
        <welcome-file>faces/index.xhtml</welcome-file>
    </welcome-file-list>

    <servlet>
        <servlet-name>Faces Servlet</servlet-name>
        <servlet-class>javax.faces.webapp.FacesServlet</servlet-class>
        <load-on-startup>1</load-on-startup>
    </servlet>

    <servlet-mapping>
        <servlet-name>Faces Servlet</servlet-name>
        <url-pattern>/faces/*</url-pattern>
    </servlet-mapping>
</web-app>
<?xml version="1.0"?>
<!DOCTYPE facelet-taglib PUBLIC
  "-//Sun Microsystems, Inc.//DTD Facelet Taglib 1.0//EN"
  "facelet-taglib_1_0.dtd">
<facelet-taglib>
    <namespace>http://foolprogrammer.blogspot.jp/jsf</namespace>
    <tag>
        <tag-name>customInputText2</tag-name>
        <source>tags/customInputText2.xhtml</source>
    </tag>
</facelet-taglib>
<ui:composition xmlns="http://www.w3.org/1999/xhtml"
    xmlns:ui="http://java.sun.com/jsf/facelets"
    xmlns:h="http://java.sun.com/jsf/html"
    xmlns:f="http://java.sun.com/jsf/core"
    xmlns:c="http://java.sun.com/jstl/core"
    xmlns:fn="http://java.sun.com/jsp/jstl/functions">
    <h:inputText styleClass="inputText1">
        <c:if test="${not empty value}">
            <f:attribute name="value" value="${value}"/>
        </c:if>
        <c:if test="${not empty style}">
            <f:attribute name="style" value="${style}"/>
        </c:if>
    </h:inputText>
</ui:composition>
<?xml version="1.0" encoding="UTF-8"?>

<faces-config xmlns="http://java.sun.com/xml/ns/javaee"
    xmlns:xsi="http://www.w3.org/2001/XMLSchema-instance"
    xsi:schemaLocation="http://java.sun.com/xml/ns/javaee http://java.sun.com/xml/ns/javaee/web-facesconfig_1_2.xsd"
    version="1.2">

    <application>
        <view-handler>com.sun.facelets.FaceletViewHandler</view-handler>
    </application>

</faces-config>
<html xmlns="http://www.w3c.org/1999/xhtml"
    xmlns:f="http://java.sun.com/jsf/core"
    xmlns:h="http://java.sun.com/jsf/html"
    xmlns:fp="http://foolprogrammer.blogspot.jp/jsf">
<head>
<style type="text/css">
<!--
.inputText1{
    background-color: yellow;
    width: 100px;
    height: 30px;
}
-->
</style>
</head>
<body>
    <fp:customInputText2 /><br />
    <fp:customInputText2 value="あいうえお" style="width:200px;" /><br />
    <fp:customInputText2 value="かきくけこ" /><br />
    <fp:customInputText2 style="width:200px;" /><br />
</body>
</html>
http://localhost:8080/JSF12Sample036-ComponentParameter/faces/index.xhtml

<?xml version="1.0" encoding="UTF-8"?>
<web-app xmlns:xsi="http://www.w3.org/2001/XMLSchema-instance"
    xmlns="http://java.sun.com/xml/ns/javaee" xmlns:web="http://java.sun.com/xml/ns/javaee/web-app_2_5.xsd"
    xsi:schemaLocation="http://java.sun.com/xml/ns/javaee http://java.sun.com/xml/ns/javaee/web-app_2_5.xsd"
    id="WebApp_ID" version="2.5">

    <display-name>JSF12Sample035-CompositeComponent</display-name>

    <context-param>
        <param-name>javax.faces.DEFAULT_SUFFIX</param-name>
        <param-value>.xhtml</param-value>
    </context-param>

    <context-param>
        <param-name>facelets.LIBRARIES</param-name>
        <param-value>
            /WEB-INF/facelets/foolprogrammer-taglib.xml
       </param-value>
    </context-param>

    <welcome-file-list>
        <welcome-file>faces/index.xhtml</welcome-file>
    </welcome-file-list>

    <servlet>
        <servlet-name>Faces Servlet</servlet-name>
        <servlet-class>javax.faces.webapp.FacesServlet</servlet-class>
        <load-on-startup>1</load-on-startup>
    </servlet>

    <servlet-mapping>
        <servlet-name>Faces Servlet</servlet-name>
        <url-pattern>/faces/*</url-pattern>
    </servlet-mapping>
</web-app>
<?xml version="1.0"?>
<!DOCTYPE facelet-taglib PUBLIC
  "-//Sun Microsystems, Inc.//DTD Facelet Taglib 1.0//EN"
  "facelet-taglib_1_0.dtd">
<facelet-taglib>
    <namespace>http://foolprogrammer.blogspot.jp/jsf</namespace>
    <tag>
        <tag-name>customDiv1</tag-name>
        <source>tags/customDiv1.xhtml</source>
    </tag>
</facelet-taglib>
<ui:composition xmlns="http://www.w3.org/1999/xhtml"
    xmlns:ui="http://java.sun.com/jsf/facelets"
    xmlns:h="http://java.sun.com/jsf/html"
    xmlns:f="http://java.sun.com/jsf/core"
    xmlns:c="http://java.sun.com/jstl/core"
    xmlns:fn="http://java.sun.com/jsp/jstl/functions">
    <div class="div1">
        <ui:insert />
    </div>
</ui:composition>
<?xml version="1.0" encoding="UTF-8"?>

<faces-config xmlns="http://java.sun.com/xml/ns/javaee"
    xmlns:xsi="http://www.w3.org/2001/XMLSchema-instance"
    xsi:schemaLocation="http://java.sun.com/xml/ns/javaee http://java.sun.com/xml/ns/javaee/web-facesconfig_1_2.xsd"
    version="1.2">

    <application>
        <view-handler>com.sun.facelets.FaceletViewHandler</view-handler>
    </application>

</faces-config>
<html xmlns="http://www.w3c.org/1999/xhtml"
    xmlns:f="http://java.sun.com/jsf/core"
    xmlns:h="http://java.sun.com/jsf/html"
    xmlns:fp="http://foolprogrammer.blogspot.jp/jsf">
<head>
<style type="text/css">
<!--
.div1 {
    background-color: yellow;
    width: 100px;
    height: 30px;
}
-->
</style>
</head>
<body>
    <fp:customDiv1>あああ</fp:customDiv1><br />
    <fp:customDiv1>いいい</fp:customDiv1><br />
    <fp:customDiv1>ううう</fp:customDiv1><br />
    <fp:customDiv1>えええ</fp:customDiv1><br />
    <fp:customDiv1>おおお</fp:customDiv1><br />
</body>
</html>
http://localhost:8080/JSF12Sample035-CompositeComponent/faces/index.xhtml

<?xml version="1.0" encoding="UTF-8"?>
<web-app xmlns:xsi="http://www.w3.org/2001/XMLSchema-instance"
    xmlns="http://java.sun.com/xml/ns/javaee" xmlns:web="http://java.sun.com/xml/ns/javaee/web-app_2_5.xsd"
    xsi:schemaLocation="http://java.sun.com/xml/ns/javaee http://java.sun.com/xml/ns/javaee/web-app_2_5.xsd"
    id="WebApp_ID" version="2.5">

    <display-name>JSF12Sample034-SimpleComponent</display-name>

    <context-param>
        <param-name>javax.faces.DEFAULT_SUFFIX</param-name>
        <param-value>.xhtml</param-value>
    </context-param>

    <context-param>
        <param-name>facelets.LIBRARIES</param-name>
        <param-value>
            /WEB-INF/facelets/foolprogrammer-taglib.xml
       </param-value>
    </context-param>

    <welcome-file-list>
        <welcome-file>faces/index.xhtml</welcome-file>
    </welcome-file-list>

    <servlet>
        <servlet-name>Faces Servlet</servlet-name>
        <servlet-class>javax.faces.webapp.FacesServlet</servlet-class>
        <load-on-startup>1</load-on-startup>
    </servlet>

    <servlet-mapping>
        <servlet-name>Faces Servlet</servlet-name>
        <url-pattern>/faces/*</url-pattern>
    </servlet-mapping>
</web-app>
<?xml version="1.0"?>
<!DOCTYPE facelet-taglib PUBLIC
  "-//Sun Microsystems, Inc.//DTD Facelet Taglib 1.0//EN"
  "facelet-taglib_1_0.dtd">
<facelet-taglib>
    <namespace>http://foolprogrammer.blogspot.jp/jsf</namespace>
    <tag>
        <tag-name>customInputText1</tag-name>
        <source>tags/customInputText1.xhtml</source>
    </tag>
</facelet-taglib>
<ui:composition xmlns="http://www.w3.org/1999/xhtml"
    xmlns:ui="http://java.sun.com/jsf/facelets"
    xmlns:h="http://java.sun.com/jsf/html"
    xmlns:f="http://java.sun.com/jsf/core"
    xmlns:c="http://java.sun.com/jstl/core"
    xmlns:fn="http://java.sun.com/jsp/jstl/functions">
    <h:inputText styleClass="inputText1" />
</ui:composition>
<?xml version="1.0" encoding="UTF-8"?>

<faces-config xmlns="http://java.sun.com/xml/ns/javaee"
    xmlns:xsi="http://www.w3.org/2001/XMLSchema-instance"
    xsi:schemaLocation="http://java.sun.com/xml/ns/javaee http://java.sun.com/xml/ns/javaee/web-facesconfig_1_2.xsd"
    version="1.2">

    <application>
        <view-handler>com.sun.facelets.FaceletViewHandler</view-handler>
    </application>

</faces-config>
<html xmlns="http://www.w3c.org/1999/xhtml"
    xmlns:f="http://java.sun.com/jsf/core"
    xmlns:h="http://java.sun.com/jsf/html"
    xmlns:fp="http://foolprogrammer.blogspot.jp/jsf">
<head>
<style type="text/css">
<!--
.inputText1{
    background-color: yellow;
    width: 100px;
    height: 30px;
}
-->
</style>
</head>
<body>
    <fp:customInputText1 /><br />
    <fp:customInputText1 /><br />
    <fp:customInputText1 /><br />
    <fp:customInputText1 /><br />
    <fp:customInputText1 /><br />
</body>
</html>
http://localhost:8080/JSF12Sample034-SimpleComponent/faces/index.xhtml

<table class="rich-table" border="0" cellpadding="0" cellspacing="0">
    <colgroup span="2">
    </colgroup>
    <thead class="rich-table-thead">
        <tr class="rich-table-header">
            <th class="rich-table-headercell" colspan="2">
                参加者
            </th>
        </tr>
        <tr class="rich-table-header-continue">
            <th class="rich-table-headercell">
                名前
            </th>
            <th class="rich-table-headercell">
                年齢
            </th>
        </tr>
        <tr class="rich-table-subheader">
            <th class="rich-table-subheadercell" scope="col">
                <div>
                    Name
                </div>
            </th>
            <th class="rich-table-subheadercell" scope="col">
                <div>
                    Age
                </div>
            </th>
        </tr>
    </thead>
    <tfoot>
        <tr class="rich-table-subfooter">
            <td class="rich-table-subfootercell" scope="col">
                Name
            </td>
            <td class="rich-table-subfootercell" scope="col">
                Age
            </td>
        </tr>
        <tr class="rich-table-footer">
            <td class="rich-table-footercell">
                名前
            </td>
            <td class="rich-table-footercell">
                年齢
            </td>
        </tr>
        <tr class="rich-table-footer-continue">
            <td class="rich-table-footercell" colspan="2">
                参加者
            </td>
        </tr>
    </tfoot>
    <tbody>
        <tr class="rich-table-row rich-table-firstrow">
            <td class="rich-table-cell">
                あいうえお
            </td>
            <td class="rich-table-cell">
                20
            </td>
        </tr>
        <tr class="rich-table-row">
            <td class="rich-table-cell">
                かきくけこ
            </td>
            <td class="rich-table-cell">
                30
            </td>
        </tr>
    </tbody>
</table>