Nexus7(2013)でIPアドレス・Wi-Fi MACアドレス・Bluethoothアドレス・シリアル番号を確認します。
【手順1】
1.ホーム画面から「アプリケーション」ボタンをタップ。

1.「設定」をタップ。

1.「システム」の「タブレット情報」をタップ。

1.「端末の状態」をタップ。

1.以下の様に表示されていれば成功です。

以上です。


| 項目名 | 項目に設定する値 |
| アプリケーション名(Application Name) | com.example.androidsample34_019 |
| プロジェクト名(Project Name) | AndroidSample34-019-GoogleMapV2MyLocation2 |
| パッケージ名(Package Name) | com.example.androidsample34_019 |
| Build SDK | API 8 |
| Minimum Required SDK | API 8 |
<manifest xmlns:android="http://schemas.android.com/apk/res/android"
    package="com.example.androidsample34_019"
    android:versionCode="1"
    android:versionName="1.0" >

    <uses-sdk
        android:minSdkVersion="8"
        android:targetSdkVersion="8" />

    <permission
        android:name="com.example.androidsample34_019.permission.MAPS_RECEIVE"
        android:protectionLevel="signature" />

    <uses-permission android:name="com.example.androidsample34_019.permission.MAPS_RECEIVE" />
    <uses-permission android:name="android.permission.ACCESS_NETWORK_STATE" />
    <uses-permission android:name="android.permission.INTERNET" />
    <uses-permission android:name="com.google.android.providers.gsf.permission.READ_GSERVICES" />
    <!-- External storage for caching. -->
    <uses-permission android:name="android.permission.WRITE_EXTERNAL_STORAGE" />
    <!-- My Location -->
    <uses-permission android:name="android.permission.ACCESS_COARSE_LOCATION" />
    <uses-permission android:name="android.permission.ACCESS_FINE_LOCATION" />
    <!-- Maps API needs OpenGL ES 2.0. -->
    <uses-feature
        android:glEsVersion="0x00020000"
        android:required="true" />

    <application
        android:icon="@drawable/ic_launcher"
        android:label="@string/app_name"
        android:theme="@style/AppTheme" >
        <meta-data
            android:name="com.google.android.maps.v2.API_KEY"
            android:value="YOUR_OWN_KEY" />

        <activity
            android:name="com.example.androidsample34_019.MainActivity"
            android:label="@string/title_activity_main" >
            <intent-filter>
                <action android:name="android.intent.action.MAIN" />

                <category android:name="android.intent.category.LAUNCHER" />
            </intent-filter>
        </activity>
    </application>

</manifest>
2.「YOUR_OWN_KEY」を【準備】で取得しておいた、APIキーに変更。<LinearLayout xmlns:android="http://schemas.android.com/apk/res/android"
android:layout_width="match_parent"
android:layout_height="match_parent"
android:orientation="vertical" >
<fragment
android:id="@+id/map"
android:name="com.google.android.gms.maps.SupportMapFragment"
android:layout_width="match_parent"
android:layout_height="0dp"
android:layout_weight="1" />
<Button
android:id="@+id/toggleButton"
android:layout_width="wrap_content"
android:layout_height="wrap_content"
android:layout_gravity="center_horizontal"
android:onClick="onClickButton"
android:text="Move to My Location" />
</LinearLayout>
2.「Ctrl+Shift+F」を押し、コードをフォーマッティング。package com.example.androidsample34_019;
import android.content.Context;
import android.location.Location;
import android.location.LocationManager;
import android.os.Bundle;
import android.support.v4.app.FragmentActivity;
import android.view.View;
import android.widget.Toast;
import com.google.android.gms.maps.CameraUpdateFactory;
import com.google.android.gms.maps.GoogleMap;
import com.google.android.gms.maps.SupportMapFragment;
import com.google.android.gms.maps.model.LatLng;
public class MainActivity extends FragmentActivity {
private GoogleMap googleMap;
@Override
protected void onCreate(Bundle savedInstanceState) {
super.onCreate(savedInstanceState);
setContentView(R.layout.activity_main);
initMap();
}
private void initMap() {
this.googleMap = ((SupportMapFragment) getSupportFragmentManager().findFragmentById(R.id.map)).getMap();
}
public void onClickButton(View view) {
setMyLocation();
}
private void setMyLocation() {
LocationManager locationManager = (LocationManager) this.getSystemService(Context.LOCATION_SERVICE);
Location lastLocate = locationManager.getLastKnownLocation(LocationManager.GPS_PROVIDER);
if (lastLocate != null) {
LatLng position = new LatLng(lastLocate.getLatitude(), lastLocate.getLongitude());
this.googleMap.animateCamera(CameraUpdateFactory.newLatLngZoom(position, googleMap.getCameraPosition().zoom));
} else {
Toast.makeText(this, "現在地を取得出来ませんでした。", Toast.LENGTH_SHORT).show();
}
}
}
2.「Ctrl+Shift+F」を押し、コードをフォーマッティング。

| 項目名 | 項目に設定する値 |
| アプリケーション名(Application Name) | com.example.androidsample39_001 |
| プロジェクト名(Project Name) | AndroidSample39-001-IntentBrowserOpen |
| パッケージ名(Package Name) | com.example.androidsample39_001 |
| Build SDK | API 8 |
| Minimum Required SDK | API 8 |
<manifest xmlns:android="http://schemas.android.com/apk/res/android"
    package="com.example.androidsample39_001"
    android:versionCode="1"
    android:versionName="1.0" >

    <uses-sdk
        android:minSdkVersion="8"
        android:targetSdkVersion="8" />

    <application
        android:icon="@drawable/ic_launcher"
        android:label="@string/app_name"
        android:theme="@style/AppTheme" >
        <activity
            android:name="com.example.androidsample39_001.MainActivity"
            android:label="@string/title_activity_main" >
            <intent-filter>
                <action android:name="android.intent.action.MAIN" />

                <category android:name="android.intent.category.LAUNCHER" />
            </intent-filter>
        </activity>
    </application>

</manifest>
2.「Ctrl+Shift+F」を押し、コードをフォーマッティング。<LinearLayout xmlns:android="http://schemas.android.com/apk/res/android"
android:layout_width="fill_parent"
android:layout_height="fill_parent"
android:orientation="vertical" >
<Button
android:layout_width="wrap_content"
android:layout_height="wrap_content"
android:onClick="onClickButton"
android:text="ボタン" />
</LinearLayout>
2.「Ctrl+Shift+F」を押し、コードをフォーマッティング。package com.example.androidsample39_001;
import android.app.Activity;
import android.content.Intent;
import android.net.Uri;
import android.os.Bundle;
import android.view.View;
public class MainActivity extends Activity {
@Override
protected void onCreate(Bundle savedInstanceState) {
super.onCreate(savedInstanceState);
setContentView(R.layout.activity_main);
}
public void onClickButton(View view) {
Uri uri = Uri.parse("http://www.google.com/");
Intent intent = new Intent(Intent.ACTION_VIEW, uri);
startActivity(intent);
}
}
2.「Ctrl+Shift+F」を押し、コードをフォーマッティング。

| 項目名 | 項目に設定する値 |
| アプリケーション名(Application Name) | com.example.androidsample34_018 |
| プロジェクト名(Project Name) | AndroidSample34-018-GoogleMapV2Traffic |
| パッケージ名(Package Name) | com.example.androidsample34_018 |
| Build SDK | API 8 |
| Minimum Required SDK | API 8 |
<manifest xmlns:android="http://schemas.android.com/apk/res/android"
    package="com.example.androidsample34_018"
    android:versionCode="1"
    android:versionName="1.0" >

    <uses-sdk
        android:minSdkVersion="8"
        android:targetSdkVersion="8" />

    <permission
        android:name="com.example.androidsample34_018.permission.MAPS_RECEIVE"
        android:protectionLevel="signature" />

    <uses-permission android:name="com.example.androidsample34_018.permission.MAPS_RECEIVE" />
    <uses-permission android:name="android.permission.ACCESS_NETWORK_STATE" />
    <uses-permission android:name="android.permission.INTERNET" />
    <uses-permission android:name="com.google.android.providers.gsf.permission.READ_GSERVICES" />
    <!-- External storage for caching. -->
    <uses-permission android:name="android.permission.WRITE_EXTERNAL_STORAGE" />
    <!-- My Location -->
    <uses-permission android:name="android.permission.ACCESS_COARSE_LOCATION" />
    <uses-permission android:name="android.permission.ACCESS_FINE_LOCATION" />
    <!-- Maps API needs OpenGL ES 2.0. -->
    <uses-feature
        android:glEsVersion="0x00020000"
        android:required="true" />

    <application
        android:icon="@drawable/ic_launcher"
        android:label="@string/app_name"
        android:theme="@style/AppTheme" >
        <meta-data
            android:name="com.google.android.maps.v2.API_KEY"
            android:value="YOUR_OWN_KEY" />

        <activity
            android:name="com.example.androidsample34_018.MainActivity"
            android:label="@string/title_activity_main" >
            <intent-filter>
                <action android:name="android.intent.action.MAIN" />

                <category android:name="android.intent.category.LAUNCHER" />
            </intent-filter>
        </activity>
    </application>

</manifest>
2.「YOUR_OWN_KEY」を【準備】で取得しておいた、APIキーに変更。<LinearLayout xmlns:android="http://schemas.android.com/apk/res/android"
android:layout_width="match_parent"
android:layout_height="match_parent"
android:orientation="vertical" >
<fragment
android:id="@+id/map"
android:name="com.google.android.gms.maps.SupportMapFragment"
android:layout_width="match_parent"
android:layout_height="0dp"
android:layout_weight="1" />
<ToggleButton
android:id="@+id/toggleButton"
android:layout_width="wrap_content"
android:layout_height="wrap_content"
android:layout_gravity="center_horizontal"
android:onClick="onClickToggleButton"
android:textOff="Traffic OFF"
android:textOn="Traffic ON" />
</LinearLayout>
2.「Ctrl+Shift+F」を押し、コードをフォーマッティング。package com.example.androidsample34_018;
import android.os.Bundle;
import android.support.v4.app.FragmentActivity;
import android.view.View;
import android.widget.ToggleButton;
import com.google.android.gms.maps.GoogleMap;
import com.google.android.gms.maps.SupportMapFragment;
public class MainActivity extends FragmentActivity {
private GoogleMap googleMap;
@Override
protected void onCreate(Bundle savedInstanceState) {
super.onCreate(savedInstanceState);
setContentView(R.layout.activity_main);
initMap();
}
private void initMap() {
this.googleMap = ((SupportMapFragment) getSupportFragmentManager().findFragmentById(R.id.map)).getMap();
}
public void onClickToggleButton(View view) {
setTraffic();
}
private void setTraffic() {
ToggleButton toggleButton = (ToggleButton) findViewById(R.id.toggleButton);
if (toggleButton.isChecked()) {
this.googleMap.setTrafficEnabled(true);
} else {
this.googleMap.setTrafficEnabled(false);
}
}
}
2.「Ctrl+Shift+F」を押し、コードをフォーマッティング。

| 項目名 | 項目に設定する値 |
| アプリケーション名(Application Name) | com.example.androidsample34_017 |
| プロジェクト名(Project Name) | AndroidSample34-017-GoogleMapV2MyLocation |
| パッケージ名(Package Name) | com.example.androidsample34_017 |
| Build SDK | API 8 |
| Minimum Required SDK | API 8 |
<manifest xmlns:android="http://schemas.android.com/apk/res/android"
    package="com.example.androidsample34_017"
    android:versionCode="1"
    android:versionName="1.0" >

    <uses-sdk
        android:minSdkVersion="8"
        android:targetSdkVersion="8" />

    <permission
        android:name="com.example.androidsample34_017.permission.MAPS_RECEIVE"
        android:protectionLevel="signature" />

    <uses-permission android:name="com.example.androidsample34_017.permission.MAPS_RECEIVE" />
    <uses-permission android:name="android.permission.ACCESS_NETWORK_STATE" />
    <uses-permission android:name="android.permission.INTERNET" />
    <uses-permission android:name="com.google.android.providers.gsf.permission.READ_GSERVICES" />
    <!-- External storage for caching. -->
    <uses-permission android:name="android.permission.WRITE_EXTERNAL_STORAGE" />
    <!-- My Location -->
    <uses-permission android:name="android.permission.ACCESS_COARSE_LOCATION" />
    <uses-permission android:name="android.permission.ACCESS_FINE_LOCATION" />
    <!-- Maps API needs OpenGL ES 2.0. -->
    <uses-feature
        android:glEsVersion="0x00020000"
        android:required="true" />

    <application
        android:icon="@drawable/ic_launcher"
        android:label="@string/app_name"
        android:theme="@style/AppTheme" >
        <meta-data
            android:name="com.google.android.maps.v2.API_KEY"
            android:value="YOUR_OWN_KEY" />

        <activity
            android:name="com.example.androidsample34_017.MainActivity"
            android:label="@string/title_activity_main" >
            <intent-filter>
                <action android:name="android.intent.action.MAIN" />

                <category android:name="android.intent.category.LAUNCHER" />
            </intent-filter>
        </activity>
    </application>

</manifest>
2.「YOUR_OWN_KEY」を【準備】で取得しておいた、APIキーに変更。<LinearLayout xmlns:android="http://schemas.android.com/apk/res/android"
android:layout_width="match_parent"
android:layout_height="match_parent"
android:orientation="vertical" >
<fragment
android:id="@+id/map"
android:name="com.google.android.gms.maps.SupportMapFragment"
android:layout_width="match_parent"
android:layout_height="0dp"
android:layout_weight="1" />
<ToggleButton
android:id="@+id/toggleButton"
android:layout_width="wrap_content"
android:layout_height="wrap_content"
android:layout_gravity="center_horizontal"
android:onClick="onClickToggleButton"
android:textOff="My Location OFF"
android:textOn="My Location ON" />
</LinearLayout>
2.「Ctrl+Shift+F」を押し、コードをフォーマッティング。package com.example.androidsample34_017;
import android.os.Bundle;
import android.support.v4.app.FragmentActivity;
import android.view.View;
import android.widget.ToggleButton;
import com.google.android.gms.maps.GoogleMap;
import com.google.android.gms.maps.SupportMapFragment;
public class MainActivity extends FragmentActivity {
private GoogleMap googleMap;
@Override
protected void onCreate(Bundle savedInstanceState) {
super.onCreate(savedInstanceState);
setContentView(R.layout.activity_main);
initMap();
}
private void initMap() {
this.googleMap = ((SupportMapFragment) getSupportFragmentManager().findFragmentById(R.id.map)).getMap();
}
public void onClickToggleButton(View view) {
setMyLocation();
}
private void setMyLocation() {
ToggleButton toggleButton = (ToggleButton) findViewById(R.id.toggleButton);
if (toggleButton.isChecked()) {
this.googleMap.setMyLocationEnabled(true);
} else {
this.googleMap.setMyLocationEnabled(false);
}
}
}
2.「Ctrl+Shift+F」を押し、コードをフォーマッティング。


C:\Windows\system32>copy c:\Windows\Fonts\EUDC.tte "C:\Program Files (x86)\LibreOffice 3\basis\share\fonts\truetype\EUDC.ttf"


/opt/libreoffice3.6/program/soffice


tar zxf LibO_3.6.7_Linux_x86-64_install-rpm_en-US.tar.gz
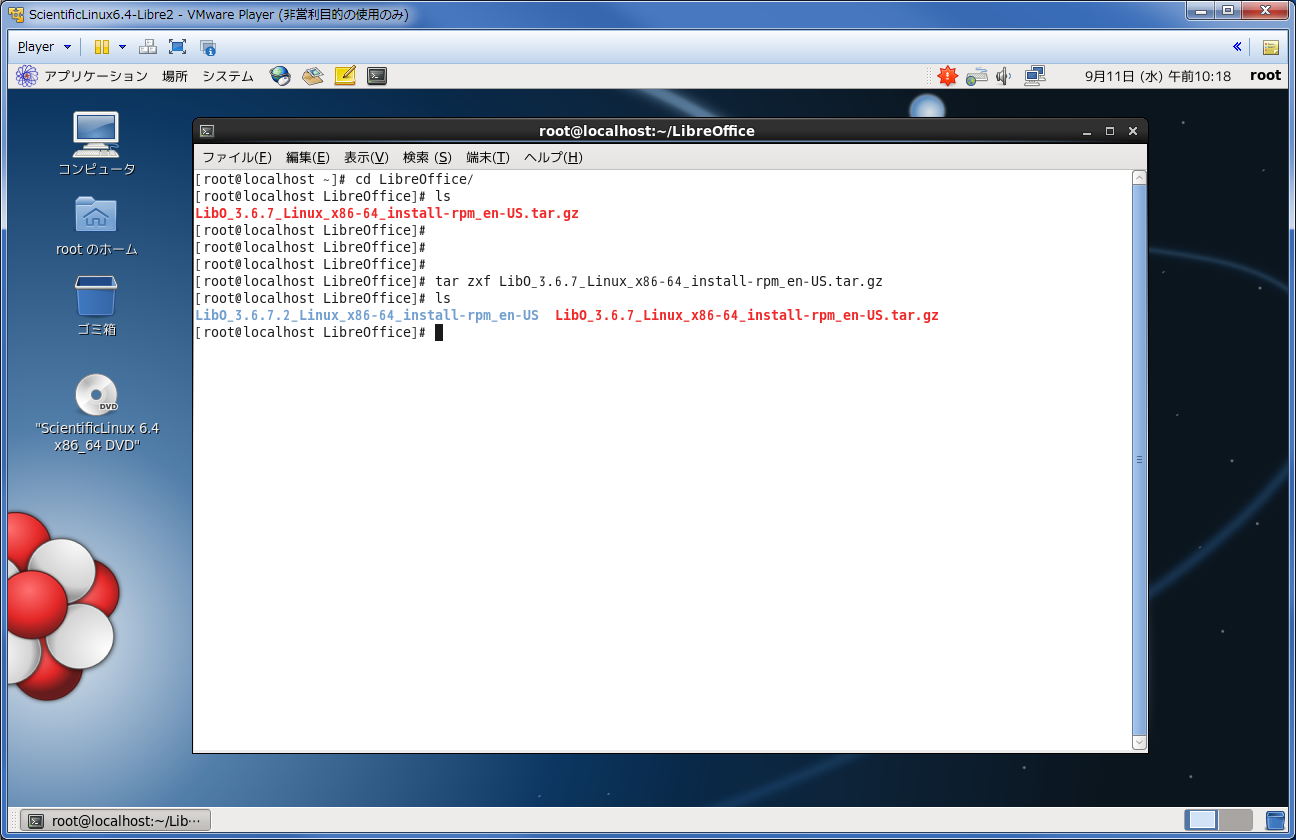
cd LibO_3.6.7.2_Linux_x86-64_install-rpm_en-US/RPMS

rpm -hiv *.rpm


